Do you want to create your own A7 envelopes and give them a unique look but have no idea where to get started?
Don’t worry!
We got you. Learning how to print on A7 envelopes at home is pretty fun and does not take much time.
There are several ways to make A7 envelopes, but we’re going to keep it as simple as possible so that you can easily make your own.
So, get ready and make sure to learn everything you can about printing on A7 envelopes!
Steps to Printing A7 Envelopes at Home
Printing on A7 envelopes at home is easy, and you can have fun while doing so. They don’t take much time, and you feel fantastic when you see how they turn out.
So, let’s go over the steps you must follow to accomplish such results!
1. Choose the Software
Choose whatever program you use most of the time to print stuff. In this tutorial, we’ll be using Microsoft Word and Excel to keep it simple. Nonetheless, feel free to use any program you feel comfortable with.
2. Place the Envelope in the Printer

Although printing A7 envelopes is pretty similar to printing on a paper, some steps are different from printing on regular paper.
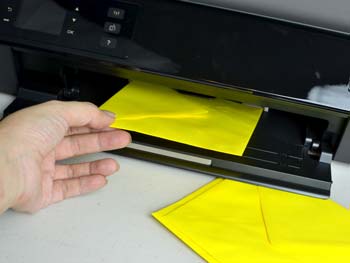
First, you want to grab the envelope and put it into your printer. When doing that, make sure to load the short edge first and then close the flap.
3. Create a Spreadsheet
Now, the first thing you want to do is create a spreadsheet with the information that you want to fill in. To do this, you simply need to create a section for the name, the address, and the country.
Take your time and fill in the spreadsheet to make sure everything is labeled correctly!
4. Set Up the Document
This is the most crucial step, and you should take enough time to carefully read through it.
So, what you want to do here is create a new word document. However, it must be the same size as your original envelope. Otherwise, it won’t match the original, and you will waste your ink.
So, in short, if your envelope is 4 1/8 inches high and 9 1/2 inches wide, the one on your PC must be the same as the original one. You also have to set the size in decimals.
5. Use a Font You Like
This is totally up to you. Choose any font you would like to see written on the envelope. It doesn’t really matter what type of font you use here.
Although you have to make sure you choose a size that is not so small. This is so the text can be easily read by anyone.
Some people might have trouble reading small fonts. So, choose a font size that is big enough for most people.
To find this out, you could try messing around with it in the editor until you notice the font size is big enough.
Now from there, you must center the text so that it looks symmetrical. Once you’ve done that, make sure to save the file.
6. Start the Mail Merge

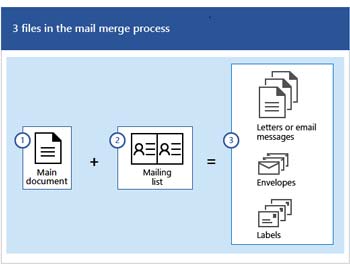
Now that we have some text, we need to start the mail merge. So, you want to go the mailing header on your Word Document and then click on recipients.
From there, you will see a drop-down menu with some options. You want to click on the “use an existing list option.”
A window with your folders will pop up, asking you to choose the file you want to open. When that happens, choose the saved Excel file.
Now that you have imported your Excel file, you need to select the area where you want to place the spreadsheet.
To do that, go back to Mailings, and a drop-down menu will pop up with the name of your cells.
Now you need to choose whatever cell you want and place them on the document file.
7. Set Up the Printer Driver
Before we move any further, there is just one thing you must do to get the printer running. You must set up your printer driver and enter a custom size for the printer.
This will help the printer know exactly what size you’re trying to print on. Don’t forget that the size must be the same as your envelope.
8. Testing the Printer
Although some people might think that this is just a massive waste of ink, you don’t want to print on several envelopes just to realize that they don’t meet your requirements.
If you don’t want to get yourself in such an uncomfortable situation, we strongly recommend printing on a sample envelope before you print hundreds of them.
So, once you get the sample, you want to make sure that the text is readable. Also, check that the envelope is not damaged after it has gone through the printer.
If everything seems to be in great shape, then you’re good to go.
9. Print the Envelopes

Now that the sample looks excellent, it’s time to print hundreds of envelopes. Follow the previous steps, and you’ll get them done with ease.
Frequently Asked Questions
Here, you can find the most common questions about A7 envelopes and how you can print on A7 envelopes at home.
Can you print on envelopes at home?
Yes, you can print on envelopes at home. All you need to print on envelopes is a printer, Microsoft Excel and Word.
What is the best way to print an address on envelopes?
The best way to print addresses on envelopes is to create cells on an Excel file. Then create as many cells as you wish and then save the file. From there, you need to create a Word document and open the Excel file you just created on your Word document.
How do I print an envelope from a PDF?
To print an envelope from a PDF, you first need to open the file. From there, you want to click on the print option. A window will pop up with a couple of settings.
Click on the “actual size” option, and then click on the “choose paper source by PDF page size” option. Set the orientation to portrait landscape, and now you’re ready to print.
How do I print an envelope in Windows 10?
To print an envelope in windows 10, all you need to do is create your envelope using Microsoft Word. Once you have the software, you want to click on Mailings and then Envelopes. A window will pop up, asking you for some details. Fill it up and then click on print.
How do I print envelopes from my printer?
Once you have set up your envelope using Word or any other program, grab the envelope and place it inside the printer. Make sure to load the short edge first and then close the flap.
Final Words
As you can see, learning how to print on A7 envelopes at home only takes a few steps, and they are quite easy to follow through.
While it might seem a little bit intimidating at first sight, once you do it a few times, you’ll get the hang of it.
You don’t even have to download any third-party programs that you’ve never heard of before. All the programs that we used throughout this article are well-known programs that most people have on their computers.
Now you know how to print on envelopes like a professional without having to spend a single cent.