It feels great to print your own designed 3D models, isn’t it? Whether it is your favorite action figure, unique jewelry pieces, or replacement gears for tools and machines, a 3D printer is capable of printing all that while keeping you away from spending on those items.
And in order to get flawless, high-quality printed models, you should consider not only the printer model but also its build plate.
Yes, that’s right. The build plate of a 3D printer is a crucial component because it provides a flat base to your 3D printed models. Plus, it holds the object into place while it is being printed.
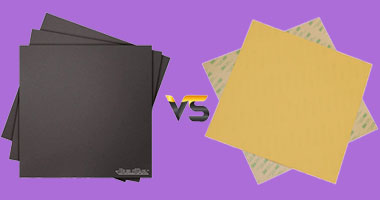
There are plenty of build surfaces available in the market, with the most common ones being PEI and BuildTak. Both build surfaces come with their own advantages and disadvantages and so it can be difficult to choose the one you need.
But don’t worry, because once to you get to know deeply about them in this PEI VS BuildTak article, you can make an informed decision about which one to choose.
What Is PEI?
PEI, also known as Polyetherimide, is a thermoplastic that retains its high strength and rigidity at higher temperatures, resists chemicals, retards flames, offers dimensional stability, and possesses excellent electrical properties.
As for 3D printing, PEI is a build surface that doesn’t require any maintenance but is used to work with almost all types of 3D printing filaments.
You can use PEI on a heated or unheated print bed without using adhesives, rafts, or brims. That’s because most PEI surfaces already come with a laminated adhesive backing that you can peel off and stick to the print bed.
PEI is great for use in the long run because you can always reuse it whenever you’re done printing a 3D model. All you need to do is clean the surface with isopropyl alcohol in between printing models. This prevents any residue from a printed model from sticking to others.
Read our related article, What is a Brim in 3D Printing? We help beginners define terms in this quick guide!
Advantages Of PEI
1. Easy To Install
First off, PEI is easy to install. Most PEI build surfaces come with an adhesive backing which you remove and apply onto the print bed. There’s no need to use additional adhesives or even a brim or a raft.
You can choose such PEI sheets if you want the installation process to be hassle-free. Beginners who often struggle with adhesion can also greatly benefit from using it.
It is also important to note that some PEI sheets don’t have an adhesive backing, and so they require you to use glue or tape.
2. Cost-Effective
PEI sheets are affordable, which makes them easily accessible for beginners as well as professionals. Despite being affordable, PEI sheets let you print 3D models for more hours and ensure high-quality results.
While you can purchase a PEI sheet for your existing 3D printer, some 3D printers already come with a PEI sheet to save the cost of purchasing one separately.
3. Provides Good Thermal Conductivity
PEI has the advantage of withstanding high temperatures of up to 400 degrees Celsius. This allows you to print 3D models at high temperatures without worrying about the build surface getting damaged due to overheating. Because of its high heat resistance, PEI is a durable material.
4. Provides A Smooth Finish
The first layer of a 3D printed model determines how well the rest of the layers will follow. Since PEI doesn’t cause any interruptions in the first layer, the resulting 3D printed model will have a smooth surface.
5. Requires Less Maintenance
It is possible to reuse PEI sheets once you have already used them for printing 3D models. After each use, it is recommended to clean the build surface with isopropyl alcohol, and it will look good as new!
Disadvantages Of PEI
1. Soft Material That Is Prone To Damage
Although being able to withstand high temperatures, PEI is prone to damage. That’s because the material is soft, and if the print bed is not leveled properly prior to printing, it can lead to permanent damage on the PEI sheet.
2. The Adhesive Can Become Stuck To The Print Bed
PEI sheets that don’t come with adhesive backing need to be applied to the print bed using tape or glue. While the process can be time-consuming, the tackiness of the adhesive can further consume time in removing the adhesive from the print bed. It might also lead to damage to the print bed.
3. Improper Bed Leveling Can Damage Prints
Another drawback of PEI is that, if you align the print bed and the nozzle improperly, it can lead to damage to your 3D prints. Not only that but also calibrating the components to perfection can be time-consuming. Unless you do it properly, you might have to let the filament and the PEI sheet go to waste.
Read More: How to 3D Print Without a 3D Printer. Is it possible? Learn more!
What Is BuildTak?
BuildTak is a popular 3D printing build surface used by many 3D printing enthusiasts. It is made of plastic, and it can withstand high temperatures of up to 125 degrees Celsius.
BuildTak is versatile as it works with all types of filaments, including PLA, ABS, PETG, TPE, HIPS, and WoodFill. So, it eliminates the hassle of swapping build surfaces for printing with different filaments.
Plus, it comes with an adhesive backing that makes it easier to apply on the print bed. There’s no need to use rafts or brims for adding support to the 3D printed model.
Not sure what rafts are? Check out our guide, What is a Raft in 3D Printing?
Apart from that, BuildTak releases 3D prints from the print bed easily as long as it is cool. It doesn’t leave any adhesive behind that would impede the printing process.
When you’re done with printing, you can clean the build surface with warm water or isopropyl alcohol for your next use.
Read our related article on the Best Way to Remove Brim From 3D Print. We share the best ways to remove brims WITHOUT breaking your prints!
Advantages Of BuildTak
1. Easy To Install
BuildTak comes with an adhesive backing that you can peel off and apply to the print bed directly. Since it doesn’t require additional adhesives, such as glue or tape, you can save your time going through the additional steps.
2. Compatible With Different Filaments
BuildTak is versatile because it supports a range of filaments, including PLA, ABS, PETG, TPE, HIPS, and WoodFill. It saves you from the hassle of swapping build surfaces in between printing with different filaments and provides a quicker way for printing.
3. Easy To Clean And Remove
Unlike most cost-effective DIY build surfaces, BuildTak comes with an adhesive that is easy to apply and remove. The adhesive won’t get stuck to the print bed and consume your time in cleaning it up. This makes it easy for you to print 3D models in a row.
4. Provides A Smooth Finish
During the creation of a first layer, the filament evenly sticks to the printing surface. That means the rest of the layers will also follow well and the resulting object will have a smooth finish. The object will not warp after the printing process is done.
Disadvantages Of BuildTak
1. Expensive
Since BuildTak works with different filaments and also can be re-used, it costs a bit more than other build surfaces. Beginners might not find BuildTak a good choice when they’re learning how to print 3D models because any damage to the build surface can lead to a waste of money.
2. Can Lose Its Adhesive
The adhesive of a BuildTak sheet can become loose after the sheet is being used for some time. That means you will have to keep a few BuildTak sheets in stock so that you can easily replace it with a new one.
3. Requires More Maintenance
While BuildTak can be re-used, its adhesive can come off if it is not maintained properly. You can gently rub the back of the build surface using sanding paper or a steel wire brush when it starts to lose the adhesive.
Even if filament residue gets stuck on the build surface, it can take a lot of time in cleaning it.
4. Misalignment Of Print Bed And Nozzle Can Damage Prints
Aligning the filament nozzle too close to the BuildTak sheet can result in damage to your 3D prints. Not only that, but the nozzle can also burn a hole on the BuildTak surface.
Read More: Best Way to Remove Raft From 3D Print. Remove rafts without damaging your prints using our helpful guide!
Comparing BuildTak Vs PEI
1. Material
PEI is a thermoplastic material capable of withstanding very high temperatures between 345 to 400 degrees Celsius. That means you can print your 3D models in a row without worrying about the build surface getting burned.
BuildTak, on the other hand, has a plastic build surface that can withstand temperatures between 110 to 125 degrees Celsius. If you use this build surface, you will need to keep in mind that it doesn’t exceed the stated temperature range.
2. Size
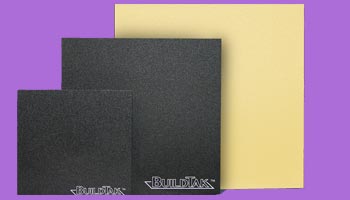
While BuildTak is available in 13 different sizes to fit in print beds of different sizes, PEI comes in one size and needs to be cut down to fit into the print bed.
Despite being available in a single size, PEI comes in different thicknesses. Thinner sheets can easily fit into the print bed but are prone to damage. Thicker sheets are stronger, but laying them onto the print bed can cause air bubbles to form between the sheet and the print bed.
3. Compatibility
PEI is compatible with only PLA and ABS, whereas BuildTak works with arrange of filaments, including PLA, ABS, PETG, TPE, HIPS, and WoodFill. If you want to have versatility, then BuildTak will be a great choice,
4. Durability
With a BuildTak sheet, you can print 3D models for up to 100 hours, while PEI sheets let you print more than that. Besides, PEI is more durable than BuildTak since it can withstand higher temperatures.
5. Maintenance
PEI doesn’t require maintenance. Once you have printed your 3D model, you can wipe the surface with isopropyl alcohol for your next use.
On the other hand, BuildTak requires maintenance for achieving the perfect results. Its adhesive can get stuck on the print bed and so you will need to take your time removing it with sandpaper or a steel brush.
6. Cost
PEI is more cost-effective than BuildTak. Not only does it costs less, but a single sheet will give you more printing hours compared to BuildTak.
Read More: Recommended Bed Temperature for PLA. Here’s where your print bed temperature should stay when printing with PLA!
PEI And BuildTak- Comparison Chart
Features | PEI | BuildTak |
Material | Thermoplastic | Plastic |
Cost | Inexpensive | Expensive |
Maintenance | Requires less maintenance | Requires more maintenance |
Installation | Offers easy installation with adhesive backing | Offers easy installation with adhesive backing |
Compatibility | PLA and ABS | PLA, ABS, PETG, TPE, HIPS, and WoodFill |
Final Word
It’s never a bad idea if you choose a build surface that works perfectly with your Ender 3 or other 3D printers. And on top of that, if the printer produces a well-adhered base layer, you know your 3D printed models are going to look right!
Both BuildTak and PEI offer high-quality prints each time, but the minor differences, such as cost and versatility, can have an impact on your preference.
Now that you have learned about the differences between PEI and BuildTak build surfaces, you can now decide on which one to install on your 3D printer.