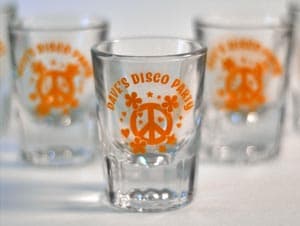
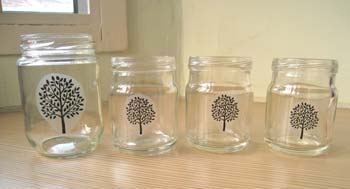
Whether you want to create a glass tombstone award or gift your loved one a customized mug, printing on glass is how you can set yourself apart.
Unlike paper printing, glass printing is not something that can be done at home unless you use decals or stickers.
Glass is slowly transforming into a decorative and functional medium for not only personal purposes, but also for commercial, industrial, architectural, interior design, and automotive sectors.
Hence, in order to make the most of this flourishing trend, you need to know all the ways of how to print on glass like a pro!
Luckily for you, today we’re all about glass printing, both DIY and commercial, aiding you to differentiate yourself from the crowd!
Glass Printing Methods
1. Screen Printing
Skin printing on glass is basically the same as how it is done on fabrics and is a trend that is getting increasingly popular by the day.
It is a method which is suitable to be applied both on the external or internal surface of your glass project. You end up with impressively durable prints that last for a long while.
Though you’ll receive highly durable prints on the glass, based on the time it takes to print on glass using this method and the cost, it is not a worthy choice if you are not producing in bulk.
Screen printing may also be limited to just four colors at once, which may also shackle down your creativity, limiting your flexibility to create the most ultimate designs. And here is a good post about printers for screen printing to do a colorful and detailed art project.
2. Digital Printing
This method of printing provides you with the flexibility to use an endless range of colors. There are basically two types of digital printing which you can perform on glass:
a) Digital UV:
As the name suggests, this method involved the use of Ultraviolet or UV light to attach the image into the glass. This method utilizes inks that are organic and lets you go wild on the unlimited range of color combos!
This is one of the most economic and efficient ways to print glass, making it a great option for when you intend to print in bulk. The only drawbacks of this method are that it may not be as durable and scratch-proof as the other digital printing method.
b) Ceramic Printing
This method involves the use of a special type of ink consisting of a substance known as ceramic frit. This substance is nothing but a mixture of glass nano-particles and pigmented colors along with a liquid medium that burns out upon the firing process. Sounds cool, doesn’t it!
These inks get joined to the glass when printing, causing it to become one with the glass object itself, making the whole thing incredibly durable and permanent. The only way to get this ink off is if you break off chunks of the glass itself! Follow this article to know the details of two popular printing methods to put images on your personalized mugs.
3. DIY-How To Put Pictures On Glass At Home
The above two methods discussed above are the pro ways to print on glass and can only be done using special glass printers that can not only support flat glass pieces but also cylindrical.
Now a glass printer is no regular piece of tech that is easily available in our homes like inkjet or laser printers are. But that doesn’t mean you have to miss out on decorating your glass projects!
Though not as permanent as the digital printing methods, these methods sure get the job done. You not only get to enjoy a great quality image printed on your project, but their temporary feature enables you to switch designs frequently, which is quite exciting if you ask me!
How To Print On Glass- Different Methods
1. Decals/Sticker
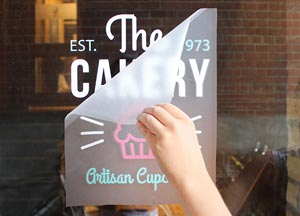
All you need to do is print your desired image using your inkjet or laser printer on your decals and just stick them on into your glass project! You can use wax papers or freezer paper directly too.
2. Adhesive
This method involves the use of an adhesive such as Mod Podge and you can print on any media of your choice.
Once done printing, coat the area of the glass you want your image on with the adhesive, and stick on the printed image carefully so that it’s perfectly aligned with no air bubbles.
3. Adhesion Upon Soaking
This is basically another type of sticker method that involves a little more legwork and time but creates beautiful results.
For this method, you have to print your desired image on your printer. A laser printer is recommended for printing photos since they use toners. This is because as this method involves soaking your printed image in water, inkjet inks might bleed.
- Once you have printed your image matching your project size, cover the image-side with transparent tape ensuring there are no air bubbles.
- Trim off the excess paper around the image and let it soak for 5-6 minutes or more depending on your image size.
- Take the image off and scrub off the paper from the back.
- Repeat the soaking process to perfectly get rid of all the paper.
- You will be left with just the image on the clear tape now.
- Stick this piece of image-transferred tape onto your glass project using additional adhesive if necessary.
4. Screen Printing
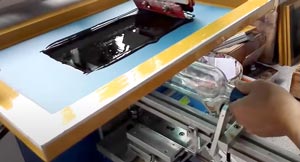
Skin printing is done using stencils of the desired designs by passing colored inks through a screen with meshes. Thanks to the stencil, the color gets blocked from reaching particular areas of the glass, while the open areas allow the ink to stain the glass surface.
Once stained, the screen-printed image is allowed to entirely dry up, which is followed by a process known as sintering.
Sintering is the process of how glass is heated to seal the image into the glass. Due to its inorganic and amorphous properties, glass has the ability to soften when the temperature is increased.
This particular feature is what allows you to heat them up to seal the printed design within the glass itself for permanency.
This is a game of the pros as maintaining the sintering temperature is absolutely crucial. If by any chance the temperature reaches too high, your glass project itself will get deformed instead of getting the picture burnt into it.
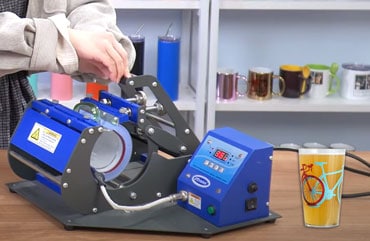
5. Heat Transfer Method
This method is relatively a more durable method to print images onto your glass projects, especially when it has an odd shape that your glass printer cannot accommodate.
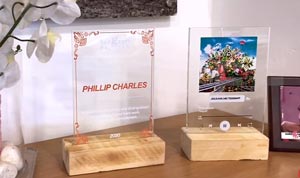
Though it requires a number of specialty tools and ingredients, you can use this method even at home if you consider yourself a pro in order to create special glass projects like glass trophies or achievement tombstones, etc.
The following are the tools you’d need:
- Heat gun
- Spray gun
- Polyprop chemical
- Your glass object
- Printed image
- Benzene and methylated spirits; or, Pentane and Cyclopentane
- A clean piece of soft cloth
Once you have procured these items, follow the steps below to get your glass printed on like a pro!
- Commence the process by printing your desired image as usual on a piece of paper. Some users prefer printing on yellow paper to make all the colors including the white, pop more vividly.
- The next step involves heating up the glass surface with the heat gun evenly to around 30-40⁰C.
- Now apply a very thin yet even coat of an activator (a transfer chemical) on the surface. Use your palms to spread it out uniformly if necessary.
- Take your printed image and create creases at the top and bottom. This will ensure that your image doesn’t touch the glass surface until you use your fingers to press them on.
- Gently start rubbing the printed paper piece gradually starting at the bottom and work your way up to the top. Use quick, short motions for effective adhesion without air bubbles forming.
- Now peel off the paper and you’ll find that the printed image has been transferred into the glass surface.
- With a spray gun, spray Polyprop chemical evenly at the finest spray setting all over the image. Maintain an ideal distance while spraying too as both these factors will aid in preventing over-spraying and dripping, which will otherwise ruin your transferred image.
- With your heat gun at the highest setting, heat up the whole glass project again for a minimum of 30 seconds.
- In order to remove the excess Polyprop chemical now, mix a solution of benzene and methylated spirits in a ratio of 1:1. You can use Pentane and Cyclopentane as a substitute mixture.
- Using this mixture and a clean piece of cloth rub around the image by applying gentle pressure until the glass surface gets all shiny.
- When rubbing over the logo, drench the cloth in the mixture and allow the chemical mixture to do the work, not the pressure.
- Apply a final dose of heat with the heat gun to brighten up the colors even more thanks to the activation of the Polyprop chemical.
6. Digital Printing
Now it’s time to go pro with your glass printing project and is a method best left to a professional unless you are the pro yourself.
Since it requires a digital printer that can print on a versatile array of media types and shapes including glass, wood, etc., it’s an investment not worth it for basic needs unless you’re running a business of your own.
- Choose a glass object of your preference focusing on its size and shape.
- Now choose your desired image accordingly and resize it if necessary.
- Proceed to prep the glass surface with a precoat or primer ink. This will make the image adhere to the glass surface. The ingredient for prepping the glass surface is reliant on the model of your glass printer.
- Apply an even layer for uniform color outputs.
- It’s time to load your glass project into the printer ensuring the correct alignment.
- Turn on your digital printer, send the image of your choice to it and begin the printing process.
- You should be provided a perfectly printed-on glass object in no time!
- Allow the glass to cool down and you’re done.
Conclusion
So you see?
Though not as common a medium such as paper or fabric, you can even customize your glass belongings to match your unique personality, for gifting something special or making a statement of your own.
Whether for personal purposes or professional, now that you know all there is to know about how to print on glass in all the fun and exciting ways, you’d never have to settle for plain and boring ever again!
Also Read: