
Even though we all have a basic mug at our house to use, we tend to look for one that represents us in a unique way or brings in some priceless memories.
That is why customized mugs have never gone out of demand. Everyone treasures a daily utensil that has been designed especially for them.
Now, you don’t have to wait for anyone to make that happen for you! Start making your own customized mugs by learning how to sublimate mugs through two simple methods!
You can pick or create the design you want for yourself or gift someone special.
What Is Sublimation In Printing?

The term sublimation is typically used in chemistry to describe the direct transition of a substance from solid to gaseous state. However, in the world of printing, it means something entirely different!
Here, sublimation represents the way you can turn a digital or hand-drawn design into a permanent imprint on a solid surface.
This is the method used by experts or hobbyists to customize mugs, bags, keychains, phone cases, notebooks and more. Here we will only focus on sublimation on mugs to get you started.
Read More: How to Sublimate On Canvas. We walk you through sublimation printing on canvas here!
How To Do Sublimation On Mugs : Step by Step Guideline
1. Necessary Supplies:

Sublimation on mugs can be done in two ways primarily. You can either use a mug press or a mug wrap for transferring the digital design.
Even though they are different methods, you will need pretty much the same supplies to do them. In addition to the objects listed below, you must have either mug wraps or a mug heat press machine depending on your preferred method:
II. Sublimation ink
III. Sublimatable mug
IV. Transfer paper
V. Heat resistant tape
VI. Heat gloves or a piece of thick cloth
Remember that all mugs cannot undergo sublimation. So a random blank mug you bought from a nearby store or a mug you already have on your showcase may not be the one you should try this process on.
If you do attempt to sublimate them, the result may not last long or the process may fail completely.
A successful sublimation guarantees that the design or image stays on the mug surface permanently. It is immune to scratching, spilling, machine washing and other usual degradations.
2. Common Steps For The Beginning
a. Produce Design
The first step to sublimate your mug is of course preparing the design to put on it. You can do this using a photo editing software of your preference or the one recommended by your sublimation mug press machine.
For the first choice, make sure that your chosen software can produce clear and vibrant images. Otherwise, the resulting photo on the mug will not come out that impressive.
Usually, Adobe Illustrator, Adobe Photoshop and CorelDraw are the top three choices when it comes to creating sublimation designs.
If you are a complete beginner, it would be a good idea to import the design created on these platforms to the software that comes with the sublimation machine or the printer.
Doing so will raise the quality of your resulting print and thus enhance the appeal of your sublimated mugs.
b. Print And Cut
Get ready to print the design on transfer paper. Before pressing on “Print”, make sure that the measurements you have given there match the ones of your sublimatable mug. This needs to be checked out so that the printed image does not go beyond the mug’s boundaries, or doesn’t overflow its edges.
If you are printing images for more than one mug, remember to cut around each design so that it fits the size of that mug. There is no need to get rid of the blank spaces which are supposed to remain on the mug after sublimation.
Additionally, check that the images have been mirrored so that their text is printed in the right direction.
c. Align And Tape
Now that the mundane parts are done, all you have to do is align the printed design along your sublimatable mug’s borders and secure it there with tape.
Remember that the usual Scotch tape will not work here since it may not be able to cope with the high temperatures required in sublimation. As a result, you will be needing heat resistant or heat transfer tapes instead.
Place a piece of this tape on each end of the design sheet that you are wrapping around the mug. The photos on that sheet should be facing the mug surface so that those images can superimpose themselves under high heat in the next step.
Read More: How to Do Sublimation With Cricut Maker. If you have a Cricut, this guide is for you!
3. Common 2 Method for SUBLIMATE A MUG
a. Mug Press
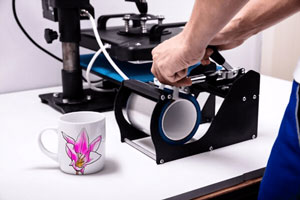
Step 1: Load Mug
After securing the design sheet, get the mug press machine started. Load the mug into this machine according to the instructions which came with it.
Make sure that you invest in a mug press that accommodates the mug sizes you have or are planning to use. That is why reading up the details of these machines before purchasing is a good idea.
Step 2: Press Mug
In order to finally press the mug, you will need to specify the temperature and the duration of pressing on the machine. It varies from person to person but sticking to 380-400 degrees for 185-250 seconds is a safe bet. You can get more accurate information by checking the specifications of your transfer paper and mug.
During the press, make sure that the mug handle is not in contact with the metal edges since that can create excess pressure.
Step 3: Remove And Cool Down
Wait for the set duration on the mug press to reach its end and then prepare to take off the mug. Since it should be incredibly hot right now, you will need a pair of gloves or pot holders to remove it from the machine.
Then carefully remove the transfer paper wrapping it with your nails and fingertips.
To prevent bleeding of the freshly printed images or designs, place the hot mug in front of a fan. It should start to cool down soon enough and be ready for packaging or use after that.
b. Mug Wraps
Step 1: Dampen Transfer Paper
After you have printed the sublimation design and secured it on the mug with heat-resistant tapes, you will need to make this transfer paper a little damp. A simple way to do so would be to soak a washcloth or towel in water and then apply it to the paper.
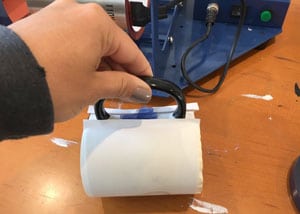
Step 2: Place Mug Wrap
Get your mug wrap and place it around the mug carefully so that it does not wrinkle the paper underneath. These wraps are usually made of silicone which can withstand very high temperatures without any deformation. They usually have a strap that you will need to buckle up through the mug’s handle.
Read More: Can You 3D Print Silicone? Probably not at home. Learn all about silicone 3D prints!
Step 3: Bake In The Oven
All you have to do now is to put the wrapped mug in an oven and set up its timer and temperature. Keep in mind that it cannot be a microwave oven or a toaster one. Usually, people choose to do this kind of sublimation through a convection oven.
For the duration and temperature, check the settings recommended by your transfer paper. It usually takes 10-15 minutes at a temperature over 400 degrees Fahrenheit.
Tips That You Should Take Care While Applying Sublimation Printing on Mugs
1. Heat Gloves For Hand Protection
Make sure to have a pair of heat gloves ready before you attempt mug sublimation. No matter what process you decide to go for, it will involve turning up the temperature around the mug up to 400 degrees Fahrenheit. So you will need to cover up your hands with heat gloves to protect them from burning.
2. Spray Adhesive Instead Of Thermal Tapes
If you don’t want to use thermal tapes during sublimation, you can use spray adhesive instead to secure the printed design on your blank sublimatable canvas. In addition to mugs, this spray can be applied to other surfaces like fabrics and garments for keeping the design in place.
3. Extra Sheets Over Transfer Paper
To ensure that the design doesn’t bleed through the transfer paper, you can use extra sheets over it before putting the mug inside your press or wrap.
Typically, waterproof Teflon or silicone sheets are used for this purpose. The latter will create a thinner layer, but also prove to be more temporary than Teflon.
Read this cool article on How to Make Personalized Mugs with Cricut for more ways to craft custom mugs.
Conclusion
Now that you know how to do sublimation on mugs in two ways, you can try out both and see which one works for you better!
Typically, mug wraps tend to be much more affordable than the mug press, since the latter is a fully functional machine that operates under extremely high temperatures. However, the press produces more vibrant and durable results than the wrap.
Also Read: