Who doesn’t love a custom-made mug, right? Apart from your own usage, it is a great item for gifts.
The custom-made mugs are made through the heat pressing technique. It basically works by pressing custom designs on the mugs.
That being said, the process is not as simple as it may seem. You will have to do it with utmost caution and precision to have the most satisfactory outcome.
If you are eager to make your own custom-made cups and wondering how to heat press a mug, then you are in the right place. Keep reading till the end to master the heat pressing method.
How To Heat Press A Mug Effortlessly?

There are multiple ways of heat pressing mugs. However, using a heat press machine is the most effective and simplest one among the numerous methods available.
As heat pressing a cup can be a little complicated, it is crucial to know about a heat press machine before understanding the process.
A heat press machine basically prints designs and images on a mug. This machine is only compatible with coated ceramic mugs.
You can create a simple, crisp, colorful image or design on a coffee mug with this special gadget.
The recently launched digital heat press machines are much more user-friendly and produce vivid images on mugs. With the aid of its precise heating, digital temperature, and time regulation, the digital mug press can transfer photos and decorate your mugs in a matter of seconds.
Now that you know what a mug press is, it is time to understand the heat pressing method.
Take a look at the most crucial steps you will have to follow to perfectly heat-press a mug.
Read this awesome article on How to Make Personalized Mugs with Cricut for more crafting ideas, tips, and tricks.
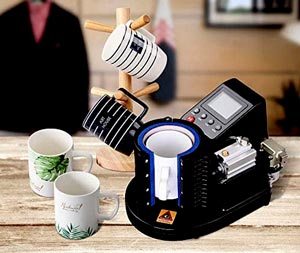
1. Choose A Good Mug Press Machine
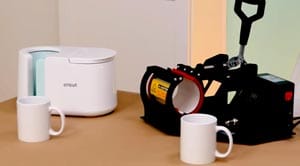
The first thing you should do to heat press a mug is buying a high-quality heat press machine. Selecting a good mug press machine is vital since it can determine the quality of the image or design on your mug.
Read More: Best Heat Press Machine for Beginners. Here are our favorite heat press machines for beginners reviewed!
2. Make A Design
You can create designs for your mug on your PC using graphic design tools such as Photoshop, Paint, and Illustrator.
You can also save time by downloading a particular picture and editing it afterward according to your requirements.
You can also purchase a portrait or mug graphic design from an art shop. This method is particularly useful if you aren’t familiar with graphic design software.
3. Print The Image On A Sublimation Paper
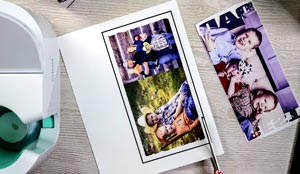
Use an inkjet printer to print the design or image you created or purchased. Print it using sublimation ink and do it on high-quality sublimation paper.
The printing method for a sublimation paper is similar to printing on regular paper.
After printing the picture on the sublimation paper, dry it for at least 30 minutes.
Read our related article on How to Use Sublimation Paper for more helpful tips and a guide that’s great for beginners!
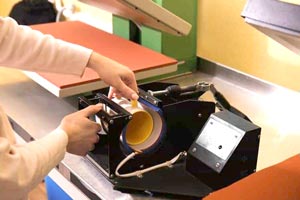
4. Attach The Sublimation Paper On The Mug
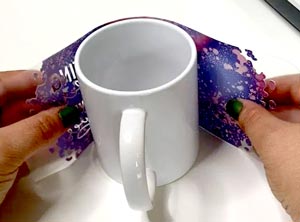
Now that you have printed the picture on the sublimation paper, you will have to attach the paper to the part of the mug you want the picture on.
You should ensure that the paper is completely dry before you apply them to the mug.
Here is how you will be able to attach the paper to the mug:
- Place the sublimation paper on the part of the cup you want to customize.
- Get thermal tape that can withstand the heat of the mug press machine.
- Use the tape to attach the picture onto the surface of the cup and gently press it onto the mug to attach the sublimation paper evenly.
Read More: Sublimation Transfer Not Working. Here’s how to get successful prints!
5. Preheat The Machine
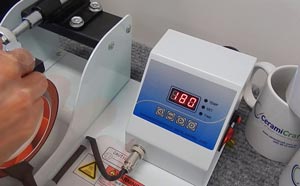
Preheating the heat press machine is very important, and it can increase the machines’ efficiency. It will help you get the best possible outcome.
The best way to preheat the machine is to turn the mug press on and raise the temperature to 100°C for approximately ten to fifteen seconds.
6. Place The Mug In The Heat Press Machine
Now put the mug within the mug frame and ensure that it is securely placed. Next, increase the temperature to 325°C and wait four minutes for the operation to finish.
However, the temperature and heating time may vary depending on your mugs’ material and the quality of the sublimation paper. Check the manual of the heat press machine before this process to get the best result.
Read More: How to Do Sublimation With Cricut Maker. Calling all Cricut-users!
7. Take Out The Mug
Remove the mug from the frame and set it aside to cool for 20 to 30 minutes after the timer has gone off. After cooling it down, remove the thermal tapes and sublimation paper with utmost caution and care.
And here is a good post if you are interested in learning how to dye sublimate custom printed mugs.
Safety Tips While Working With a Mug Press Machine:
- When heat pressing glass mugs, don’t place the mug in the pre-heated press and sudden temperature fluctuations will cause the glass to crack.
- To prevent any possibilities of burns, allow your mug to cool after the heat press process is complete before removing it.
- If you’re too impatient to wait, use oven gloves or any heatproof pair of gloves when handling hot mugs.
- When placing the mug and adjusting how much pressure the heating element will be exerting on the mug, don’t go overboard as tightening it too much will crack or deform the mug. Adjust it according to the mug’s size.
- In order to prevent plastic mugs from deforming during heat press, place on insert tool inside the mug to hold its shape intact.
- Preheating your mugs is a smart way to prevent the effects of sudden temperature changes and also aids in receiving deeper colors with lower chances of fading.
- Confirm with the manufacturer of your mugs to decide what temperature and pressure can be applied on the mugs and how long they need to be heat pressed.
- Keep your images away from the mug’s uneven edges as the heat press won’t work as effectively there, resulting in poor ink transfer.
- Allow the heat pressed mug to cool down entirely before you peel off the transfer plastic.
Read More: How to Remove HTV From a Shirt. New to heat transferring? Mistakes happen. Learn how to correct them in this DIY guide.
Final Words
By knowing the right way of heat pressing a mug, you will be able to customize your mugs within a matter of minutes. It will help you create great gifts for your family and friends.
After reading our article about how to heat press a mug, we hope you won’t have any issues while applying images or designs to your cups.
Up Next: How to transfer an image onto glass?