
These days, printing a photo of your pet on your ceramic coffee mug is all the hype. You can find many people drinking out of customized coffee mugs with a picture attached to them.
And considering how cute it makes the mug look, there is no wonder that many people are getting into the hype.
But how do you do it? Do you just take a picture and tape it over the mug?
Well, no. That way, the picture will not last very long, and anytime you wash it, it will come off.
In this article, we will share two simple and neat ways to print photos on ceramic mugs that you can do yourself in the comforts of your home.
How To Print On Ceramic Mugs : Two Different Method Explained
There is not one but two easy methods to print ceramic mugs at home, and we will teach you both of them. That way, you can go with the one that seems most comfortable to you. The two common ways to print ceramic mugs are:
- The electric iron method
- The heat press method
In the following section, we will go through the steps you need to take for both of these techniques.
1. Electric Iron Method for Printing Ceramic Mugs

The electric iron printing method for ceramic mugs is the preferred choice for many people because of how easy it is to pull it off. There are a couple of items you need for this method. They are:
- An electric iron
- A ceramic mug
- An inkjet printer
- A pair of scissors
- Rubbing Alcohol
- Microfiber cloth
- Sublimation paper
- Heat-resistant Tape
Step – 1
The first step of this method is pretty simple, choose your mug and the photo you want to print. Choosing the mug is pretty simple since you can just about use any ceramic mugs on the market. However, we recommend choosing a mug that contrasts the color tone of the photo that you will be using.
For instance, if you want to print a white image, going with a black mug might be the better choice. It would help the image in the mug pop after printing. Inversely, if you are printing a dark picture, going with a white mug might be better. It ultimately comes down to your preference and taste.
Step – 2
Choose a high-resolution image that you want to print. Going with a low-resolution image will not give you a good effect after printing.
It might come out blurry, which will not look that good on your mug. So always go with a high-quality image that comes out crisp and sharp for your ceramic mug.
In this step, you have to print your selected photo. As for paper, go with sublimation paper as it will make it easy to transfer the image to the mug using an electric iron. While exporting the image, make sure you choose the best quality available for printing.
Step – 3
After printing the image on the sublimation paper, you want to put it aside and focus on cleaning the mug. Use a bit of rubbing alcohol and a microfiber cloth to wipe the surface of the mug thoroughly.
You do not want any dirt or debris to be on the surface when you paste the image.
Then use a pair of scissors to cut the sublimation paper the way you want to fit on the mug. You can paste the image any way you like.
In fact, you can even wrap it around the entirety of the mug if you want. When you are happy with the positioning of the image, fix it to the surface using a piece of tape.
Step – 4
Now take your electric iron and start heating the mug so that the photo gets firmly attached to the ceramic surface. It can take around 2 to 3 minutes for the image to fully paste. Try to apply the heat evenly so that the entire image gets attached without any inconsistencies.
This is the main step of the entire method, so you want to take things slow. Take care not to apply too much heat as it can burn the photo.
It is best to check from time to time to see if you notice any burn marks. After around three minutes, your picture should be fully pasted.
Step – 5
Now that the image is etched, it is time to peel off the sublimation transfer paper. Take it slow and peel off the paper gently. Do not be too hasty, as a sudden jerk can dislocate the image, ruining your entire effort. Use your thumb to gently peel it off instead of going with one swift motion.
When you are done, your mug should have the desired image fully pasted on the surface. You can now clean the mug thoroughly, and it is ready to be used. So go ahead and enjoy a fresh cup of coffee in your new ceramic mug.
Read How to Make Personalized Mugs with Cricut for fun crafting ideas.
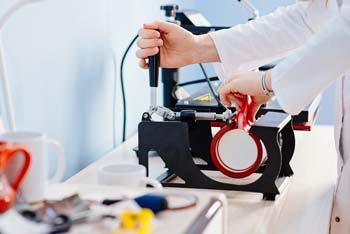
2. Heat Press Method for Ceramic Mugs Printing
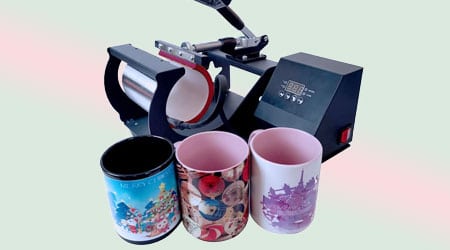
Another easy way to print photos on ceramic mugs is by using the heat press methods. The items you need for this technique are as follows:
- A sublimation printer
- A mug heat press machine
- A ceramic mug
- Dye Sublimation ink
- Heat-resistant tape
- Sublimation transfer paper
- A pair of scissors
- Oven mitts
Step – 1
The first step is to choose your image. Similar to the previous method, we recommend choosing a contrasting image when you want to use it on the ceramic mug to ensure a good match of design. Also, make sure you think about the size of the design.
Keep the dimensions of your mug in mind when you are making your design. You can get an image from your phone or make an interesting custom design yourself using any image editing software like Adobe Illustrator or Photoshop. Additionally, there are many custom templates available to use online
Step – 2
For the next step, you want to print the image once you have it ready. While printing, make sure you are using the correct options on the printer for the best resolution and print quality. Also, check if there are proper amounts of ink and transfer paper in the printer for this step.
After getting your print, you want to cut it down to fit the dimensions of your ceramic mug. Wrap the image around the mug, and it should give you an idea of how much you need to cut. Then, attach the image firmly to the mug using heat-resistant tape at each end.
Step – 3
Now you want to set up your dye sublimation mug press. Set the temperature to around 400 degrees Fahrenheit, and the pressure adjustment to medium-heavy. The timer should be set around 4 to 6 minutes. However, depending on the mug and the heat press, the time could be higher.
After reaching the proper temperature, you can place your mug inside the heat press. Make sure there are no wrinkling or folding of the paper. Any inconsistencies in the image placement can damage your design, and there will be no coming back from this.
Step – 4
After placing the mug inside, you are ready to start the image transfer. Close the door of the heat press and start the machine. When the time is up, open up the press and take out the mug. Make sure you are wearing oven mitts when you do that, as the mug will be extremely hot.
Then you need to remove the transfer paper slowly from the mug. You can use your hands for this step. However, we recommend using a pair of tweezers or a sharp knife. This will help you get better leverage and can make it easier to peel off the transfer paper.
Step – 5
Once you have peeled off the transfer paper, you should already see the image printed on the mug. However, keep in mind, the mug is still hot, and you should give it some time to cool off. Do not rinse it right now, as the drastic change in temperature can crack the mug.
It is best to leave the mug under a running fan and give it time to cool off. Once it is cool, wash it thoroughly before using it. This image you get from this process is quite durable and should not fade away anytime soon.
Final Thoughts
Printing designs or photos on ceramic mugs are certainly a fun project. This is the easiest way to give your plain and boring mugs a new life. The two methods to print ceramic mugs we discussed in this article are easy, and you can do both of them at home without too much investment.
As long as you have an inkjet printer at home, you can go easily go with the electric iron printing method. However, the sublimation heat press method is much more durable and looks better, in our opinion.
Related to read: