Transfer papers are a very vital part of t-shirt printing, especially if you use a heat press. If you are in the printing business, then you already know what they are. But for the sake of beginners, we will give a brief introduction.
A transfer paper is a paper on which the image is printed and then transferred to a surface (fabric, canvass, or wood). They are often more compatible with inkjet printers which give a pulsating and vibrant appearance when transferred to the shirt.
Whatever your reason for using transfer paper is, you must know how to use it to produce a neat and immaculate design. Learning how to do that is not difficult and requires little or no prior knowledge of printing.
We have compiled a step-by-step guide to help you through the whole process. With this knowledge, we believe that your printing business or hobby is going to be stress-free.
However, it is more important to have the ability to apply the knowledge into practical terms. Read on to find out more.
Types of Transfer Paper For Tshirt
Before you begin, you must know the models and their uses because transfer paper is very important material in T-shirt printing industry. Many people believe that the ink used in printing the graphics is what makes transfers effective, but that is far from the truth. The reality is that the paper type is the determinant.
There are two types of transfer papers, viz:
Light Transfer Paper
These papers are usually light-colored with colors like white, baby pink, and other extremely light colors. They are used to transfer graphics to shirts of similar colors. Inks used in these papers are usually translucent and can only appear on light-colored fabrics.
Dark Transfer Papers
These are the opposite of the light papers. They are dark and are used to transfer images, letters, etc. to dark colored shirts. While using this, the ink is transferred in a white background that serves to block the color of the fabrics from showing.
Choosing the right transfer paper goes a long way in ensuring an excellent transfer. Another thing is making sure you use an inkjet printer.
How To Use T Shirt Transfer Paper: Beginners Guide
How do you do screen print transfers?
Without boring you with stories, we present a simple set of instructions to guide you through your use of transfer papers. They are quite easy to follow and can be used by first-time users and also people looking to perfect their printing.
Step One: Getting the Appropriate Heat Press Machine
For you to start printing using a transfer paper, you must have a heat press machine or at least know where to get it from. Well, having one is good, but is the machine going to serve its function?
Well, the project you are working on will decide if the machine is going to be of use. The pressure, heat-press time, and temperature are also essential determinants. However, there are generally two things to consider when getting a heat press machine, and they are:
The Design
There are different types of heat press machines in various styles and designs, each having its unique features. These features are what determines the kind of project you can undertake with the machine.
Some heat press machines include malfunction, swing-away, and slide-out drawer. If you are in need of something more versatile, then the swing-away is your best bet.
The Size
Size also plays a pivotal role when getting this type of machine. For instance, if you work with smaller designs, like a few letters or small designs, then you should choose a smaller device. This will give you a perfect print. You do a deep dive into the printer for heat transfer paper in our article on how to print t-shirt easily by using heat transfer paper capable printer.
Generally, there are three sizes to choose from, and these are:
- Small heat press machine.
- Medium/standard heat press machine and.
- Big heat press machine
Read More: How to Put a Printed Photo On a Shirt. We show you a handful of different ways to do it!
Step Two: Choosing a Suitable Fabric
The kind of fabric you are printing on will also affect the end product of your material. As we all know, it is not every fabric that we apply heat on. And from the name, heat press actually uses heat.
So when working using this, it is crucial to avoid any fabric that is not heat-compatible. These include most synthetic materials. Cotton, spandex, and polyester are suitable alternatives.
Step Three: Selecting the Right Transfer Paper
We have mentioned earlier that the different types of transfer paper and the color of the fabric is what determines the model you are going to use.
Accordingly, there are other variations whose use is dependent on the type of printer and method used. Some of them are:
- Inkjet transfer paper can only be used with inkjet ink and printer.
- Laser transfer papers are only to be used with laser printers.
- Heat transfer vinyl is already made. All you need to do is cut out the design and then paste and print.
Step Four: Preparing the Graphics
Once you have chosen a machine, fabric, and transfer paper, you have to make your graphics. The graphics include the image, artwork, writing, logo, or any other thing you want to print on the shirt.
For this, you will need a computer and the appropriate software. This software will allow you to play with designs until you are satisfied with one. The most common ones are the Adobe illustrator and Corel-draw software.
If you do not have a computer, the software or time, there are freelancers or graphic designers that you can pay to make the graphics for you.
Read More: Best File Format for Shirt Printing. Low-resolution files result in poor-quality prints. We share the best file formats to get top prints!
Step Five: Print on Transfer Paper
Now, you have to get your transfer paper ready. Don’t fret; it is as simple as printing on an ordinary paper. You just have to ensure that you print the design on the coated side of the paper.
From the outcome of the printing, you will be able to tell if the color is right or if you will need to adjust that. If you make any mistakes, keep printing until you get the perfect outcome on paper. Also, remember to reverse the image before printing on the transfer paper. This is particularly important when using light transfer paper.
Step Six: Test the Transfer Paper
When you have finally gotten the perfect design printed on the transfer paper, it is time to test it out on the fabric to see how it will look. This is why we advise that you get as many transfer papers as possible. Similarly, make use of old shirts and fabrics for the testing.
Like with the printing, you test to see how the print will look on a shirt. You check the size ratio, the color contrast, etc. And then you make whatever changes are necessary based on the outcome of the samples. Also, you can have people give their opinion so that you come up with an impeccable result.
Step Seven: Print the Shirt
Now that you have tested the design and have everything ready, you can prep your heat-press machine by adjusting the time, temperature, and pressure based on the type of fabric you are using. Most transfer papers and heat press machines come with the essential guide on a manual.
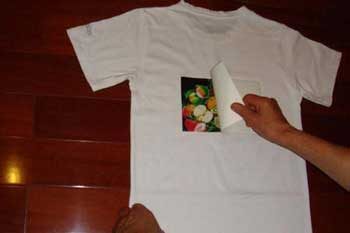
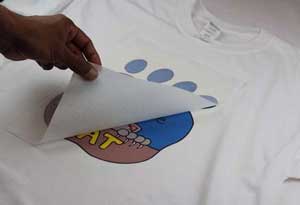
The next thing is to place the transfer paper on the shirt, with the printed side touching the shirt at exactly where you would want the design. Place the Teflon paper on the shirt. Adjust and make sure that the paper has not slipped off the shirt.
Press the machine to transfer the design. To avoid ink from getting to the other side of the shirt, you can place a cardboard paper between the two sides of the shirt. Remove your shirt and let it dry before folding and packing.
Common Mistakes in Printing with Transfer Paper for T-shirts
There are a few mistakes that people make when printing with transfer papers and heat press machines. Knowing them and avoiding them will make your work spotless and wholesome. They are:
- Not getting the right type of transfer paper for the printer you are using and the color of the fabric.
- Forgetting to reverse or mirror the design before printing on transfer paper.
- Printing on the other side of the paper as opposed to the coated side.
- Failing to test the design by printing in the transfer paper.
- Refusing to test the transfer paper by printing on an old shirt to allow necessary adjustments.
Read More: Best File Format for Shirt Printing. Low-resolution files create low-quality prints. We share the best files for t-shirt printing!
Conclusion
By now, you might have already understood that printing on a t-shirt using a transfer paper is not that hard. Although the information might be overwhelming, you can jot down the essential tips. Be very vigilant while working until you are more familiar with the whole process.
We have also tried to make the guide easy to follow and tried to avoid the use of technical language to make it suitable for beginners. We earnestly hope that you have found it useful and worthwhile.
Good luck and happy printing!
Related article that you may like: