Scanning is probably the only way to bring physical documents to digital life. But regular documents are pretty easy to scan. The problem comes when you want to transport a large piece of art into the digital realm.
So, how to scan large artwork if it doesn’t fit in a typical scanner? Well, it’s easy – you just need to scan the piece in sections.
Yes, you read it right – you won’t have to cut or tear the artwork apart. Just scan a few sections at a time and then connect everything on a computer.
It sounds easy, but it’s not. So we decided to make a relatively brief guide with every detail and factor to consider. If you’re looking to scan your large artwork but can’t seem to find an easy way to do so – this article is for you. Read up!
Why Use a Scanner and Not a Camera?
Let’s first explain why a scanner is the only device that can help you scan your artwork.
There are many reasons here, though. So we’re going to explain why a scanner is such an excellent piece of equipment, and why a camera is not worth using. Here’s what we mean:
Scanners Are Simpler
The first and probably most obvious reason is that scanners are more straightforward. You just need to connect it to electricity, install it on a computer, and then you can scan as many artworks as you want. They will drop off directly on your PC.
With a camera, you will have to look for a place with ideal lightning and no shadows, set up a proper lens, find the perfect position to take the photo from, and eventually transfer everything to a computer via USB or Bluetooth.
Scanners Offer Higher Scan Quality
It may seem a little counterintuitive, but it’s true. When it comes to reproducing physical artwork in digital, cameras tend to fail if you want the piece to look flawlessly.
Scanners provide the brightness, detailing, resolution, vibrancy, and more faithful reproduction from physical to digital – without distortions from lightning, shadows, or movement. The scanner for documents and photos gives you all facilities to take care of all your scanning needs.
Scanners Are More Accessible
Even the largest scanner is merely less than half of what a high-end camera cost. And despite that, you get even better quality on the scan than with a camera photo.
If you don’t have the money to buy a new scanner, then you can always rent one from supply shops and other similar places. Renting a camera is more difficult, especially if you’ll need extra equipment like lightning and lenses.
So, are you clear on why a scanner is the only way to go? If yes, then keep reading to learn about the steps you need to take to scan your big artwork.
6 Steps to Scan Large Artwork
We wanted to be brief, but we also wanted to explain everything as well as we could. This wasn’t easy, of course, but we managed to come up with an easy-to-read and comprehensive guide.
If you’re looking to bring your physical artwork to the digital world, then follow these steps:
1. Pick the Right Scanner

First and foremost – make sure you get a scanner that indeed works for scanning your piece of art. How can you pick such a scanner, though? Well, easy – you need to consider all the different factors that matter, such as:
- Type of scanner
- Size
- Scan quality
- Image & color format
We’re going to explain each one of these features next:
➥ Types of Scanner
You will find two main types of scanners in the market: the CIS Scanners and the CID Scanners. What’s the difference here? Well, the CIS scanner only works with plain & smooth paper – meaning if you place something with a textured surface or something that raises, it won’t work too well.
In contrast, the CID scanner works with both smooth and textured pieces. You can scan anything from acrylic paintings to water-color paper, and even corrugated paper with no issues.
But how is that possible? It all comes down to the design of the scanner. A CIS model comes with a lid or cover that pushes the document/piece down to add pressure. This pressure helps bring the piece down to the glass so the scanner can take the best image possible, without blurriness or background light.
A CID scanner, on the other hand, doesn’t have this cover/lid. And if it does, there’s no need to use it for a proper scan. You can leave the top raised, and it will still provide the scan quality you demand. Yet, they’re more expensive than CIS scanners.
And you need to go for the one that meets your standards. If your artwork is thick or difficult to flatten out, then a CID scanner is the way to go. But if it’s not and you can push it down to the glass with no issues, then a cheaper CIS model will do the job.
➥ Size
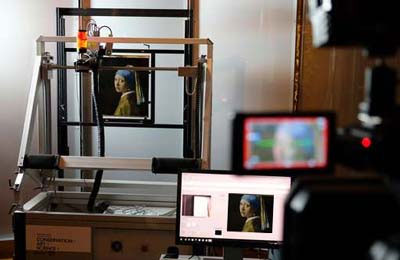
Some scanners can handle standard A1 pages, others can handle larger A4 paper, and so on. But there’s nothing that can handle a large piece of artwork. That’s why you must consider getting the largest possible scanner you can. We know this can be expensive, so proceed as necessary.
Remember, the smaller the scanner is, the harder it will be to scan it all. You’ll have to scan several parts of the art piece separately, and then unite them through a design program. If the scanner is small, then you will have to take more scans on the artwork, and you’ll have more images to put together later.
For example, a 50-inches wide artwork in a 10-inches wide scanner will take at least 5 scans to get it completely. But the same artwork on a 50-inches wide scanner will take 1 or 2 scans only.
➥ Scan Quality
Two factors matter enormously when looking for excellent scan quality – DPI and PPI. While both are essential for the overall quality, we always put much more attention to DPI. Why? Because DPI (dots per inch) refers to how many dots of image there are per inch.
The more DPI the scanner offers, the bigger the image you will get on each scan, and the larger it will be.
That’s why we recommend getting at least 300 DPI (dots per inch) if you want a neat enough scan of your artwork.
If you want exceptional quality, then don’t go for scanners with 1200 DPI. Otherwise, you may end up with something that looks fuzzy or not smooth.
Then you will find PPI (pixels per inch). It is a similar measure to DPI, yet it is less important because it refers mostly to details instead of size. Follow the same guidelines of having at least 300 PPI for decent quality. Otherwise, you may get pixelation and blurriness.
➥ Image & Color Format
Lastly, consider what type of format the scanner works with. There are many to consider:
- JPG / JPEG
- PNG
- BMP
- PCX
- TIFF
We recommend the scanners that work mainly with TIFF files. They preserve quality much better than any PNG/JPEG – and that’s because TIFF doesn’t have a single inch of compression.
Other excellent choices would be BMP and PCX. They also preserve quality well and provide the ideal format to import into design software.
Similarly, you want a proper color format. This can be slightly more difficult to find if you aren’t tech-savvy. But if you can change it and/or customize it, then make sure it is CMYK (Cyan, Magenta, Yellow, Black). This color scheme is ideal for providing perfect vibrancy and brightness to the scanned artwork.
Still, you can pick whatever you find more practical. But be aware that quality can change enormously from one format to the other, especially in large pieces of artwork like this.
2. Choose an Editing Software
You’ll find tons of editing software options to go for. But we recommend Adobe Photoshop for its ease of use and compatibility with most files to import/export.
You can use other programs still, like CorelDRAW, Luminar, Capture One, and so on. Whatever you know how to use or find more familiar will be an ideal choice. Still, always make sure it can handle the type of file you want to use: TIFF, BMP, PCX, etc.
At the same time, the design software should work with layers. It shouldn’t be a standard photo-editing softwared, but something more serious that can handle complex jobs. Later, you’ll know why this is important.
And lastly, be sure it is something your computer can handle. Some programs like Photoshop can be pretty resource-demanding. Others like CorelDRAW are slightly lighter and easier to work with. If you have a slow computer, then lighter software like Corel will work wonders.
3. Prepare & Test
Once you have the scanner and the software, you need to prepare them for the scanning.
Here’s how to prepare everything:
- Start by connecting the scanner to the computer and electricity. If it is connected already, then proceed by cleaning the surface from dust and debris.
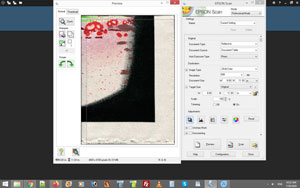
- Now adjust the scanner settings to as many DPI as possible and to the right format. Then test with a photo, portrait, or a small portion of the artwork.
- Once the test image is saved on your computer, then you can check whether it has the right format. If it doesn’t, you may need to download the scanner software or modify it directly from its manual system. This could take a few minutes.
- After ensuring the ideal format, you need to open up the files with your editing software. If the program can’t open the files, then you may need to change to another one.
If the image was saved correctly and you could open it with no problems, then you’re done with the testing. You can proceed with the real scan with no issues.
4. Start Scanning
Now, this is where the harder steps start. You’ll need to make sure that everything lines up correctly for the scans to be perfect, and you can eventually stitch them together.
Here’s how:
- First, create a mental map in your mind as to how you want to divide the artwork. Then calculate depending on the size of the scanner and the size of the artwork. Example: a 50 by 50 inches artwork may need to be divided into 5 parts for a 10 by 10 inches scanner.
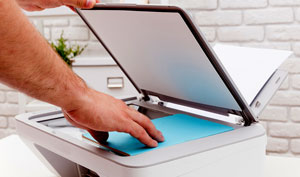
- Once you have the mental map, you can start lining up the artwork on the scanner accordingly. Start by facing the artwork down on the scanner. Make sure to place the artwork as flat as possible. It should match the scanner glass borders, so nothing stays out of the scan.
- Remember that every section you scan needs to match the other ones. That means you shouldn’t repeat the same section twice. But at the same time, you may want to overlap a little. This will make it easier to stitch together without missing sections or gaps.
- Now you can press the scan button on the machine and let it do its work. Be sure to not save anything before having a preview. Check that everything lines up correctly before saving the file. If it doesn’t, then line up the artwork as necessary.
- Finish by saving the files on a custom folder on your computer. Make sure everything is in the same folder so you can edit everything later without problems. Also, don’t forget to check if the files have the right format again. If everything looks correct, then you’re done with the scanning.
Now that you’ve successfully scanned everything, you’re ready to proceed with the editing & stitching of the files.
5. Check the Scan Files
Here, you will have to hop on the computer. It’s time to check whether the files look good enough, and plan how you’re going to stitch them together. Plus, make any edits necessary.
Follow these steps:
- Open the editing software. If you aren’t familiar with editing programs, then ask for the help of someone who has experience. Otherwise, there are tons of tutorials online you can follow.
- With the editing software ready, you will try to open the saved files from the scanner. Look for the folder you saved everything in, and then proceed to open each one.
- Most editing programs like Photoshop let you open each file as different projects. Check them this way before putting them in the same project.
- They all should look neat, with probably a few parts overlapping, but you can cut them later. The scans will be all over the place, though. Some of them will need to be cropped, re-sized, or rotated. This is the time to do so.
- Remember not to change the resolution and/or DPI of any scanned file. If you’re cropping or re-sizing the image, make sure it doesn’t change much. And if there’s a window to change the quality or something similar, omit it. Some editing programs le you set every file at the same size/resolution.
Once you’ve checked all the scan files and made the first few edits, then you’re ready to stitch them together.
6. Stitch the Scans Together
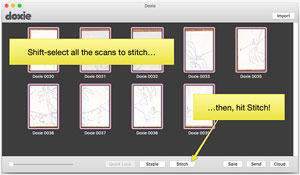
This is the hardest part of the whole process. And you’ll have to be careful as well as patient, so everything fits correctly. But it is not rocket science either.
Here’s how to proceed:
- Now that you’ve opened each file and fix them as necessary, you can continue to put them together. Here, you’ll see how they fit, depending on the edits you made. If necessary, edit each part again individually.
- Then, open a new project on the editing program. Set a background color that doesn’t mix with the artwork color. This will help you edit everything with ease. Now you can upload the scan files to the new project.
- Remember to place each layer on the new project as a layer. If you had to scan the artwork in 6 pieces, you’d have 6 layers to work with. Don’t merge the layers until the end.
- With each layer adequately edited and ready, you can start aligning them together. Adjust the opacity of the layers at 50% (or whatever you find more useful). This will help you move the pieces together more easily.
- Once you place the first layer on the file, move its opacity to 100%. This allows you to align the other layers smoothly. Be patient to adjust them correctly using the mouse and arrows keys. Don’t leave any gap and overlapping part.
Remember to achieve something you like. There’s no need to add special effects or anything of the like. Just set the layers together, so they fit with the original physical artwork.
Read More: How to Fix a Polaroid Camera. Old Polaroids can have problems. Here’s how to fix them!
7. Finish and Save
After setting all the layers together (this can take anywhere from 10 minutes to several hours), and you liked the final result, then you’re ready to stitch them together.
Here’s how:
- Find a function that lets you merge the layers into a single image. This is called “flatten” on Photoshop but can be a different name on other editing software.
- Once you’ve merged the layers, then you need to eliminate any remaining bit on the image. This could look like the background color, orange, or with dots (gray/white/black). Re-size the image if necessary, but make sure it doesn’t change the DPI and/or resolution.
- If the colors change a little after you’ve merged the layers, then you may need to edit the image. Be sure to be careful here and only do so if you know precisely how. Otherwise, keep the image as it is.
- Finish by saving the image in your preferred format. We recommend TIFF, BMP, or PCX, so the quality stays the same with little compression.
By now, you’ve successfully scanned a large artwork.
Scan Your Large Artwork Now!
As you can see, learning how to scan large artwork can take a little more time and effort than expected. But if you do it right, then it’s totally worth it.
There’s no other way to bring large art pieces to be digital unless you have an industrial scanner. And these can be both difficult to find and incredibly expensive.
So follow these steps, make sure you do it right, and scan your favorite artwork with our help. You won’t be disappointed with the final result!
Recommended Article To Read: