Prints on T-shirts have been a trend for a while now, and it does not seem like it’s leaving anytime soon.
These prints add an individual style, classiness, and elegance to an ordinary shirt.
Printing on shirts is an easy and stress-free work although the ease depends on the quantity and complexity of the prints.
It could be as simple as a home DIY project, a small business, or a big enterprise.
However, one thing that can make the process difficult is when you don’t have the appropriate materials.
There are a lot of materials for t-shirt print out there whose uses are determined by the scale of the printing.
Ordinarily, knowing what to buy for a specific task might be difficult.
So, we decided to bring the most common t-shirt printing materials to you. This list will serve as a guide for you regardless of what you need the materials for.
The list can be used by anyone looking to start printing on shirts, whether for a business or personal DIY projects. Continue reading to know what you need.
Materials Needed for T-shirt Printing
You might have a questions like that what do i need to print t-shirts at home?
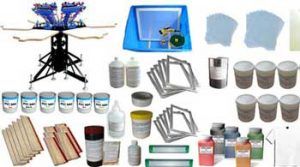
Below is an overview of the equipment needed for the t-shirt starting from the basics. This is, however, not according to relevance. So feel free to get whichever first.
Read our related article on T-Shirt Printing Business Equipment! See what equipment you need to invest in to get started.
1. Heat Press Machine
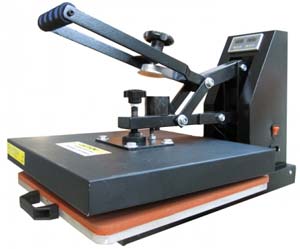
These are machines used to transfer artworks and graphics to shirts.
They are very versatile as they can be used for a lot of things, including mugs, shoes, tote bags, mouse-pads and lots more.
Heat press machines can vary from manual press machine that does not require electricity to electronic press machines and commercial grade press machine.
The type you get is dependent on your budget and what you use it for. If you are starting, we recommend that you get the manual or electronic press machine.
It is essential if you are into team printing. This is because you are using a single design for all the shirts, so they are all uniform.
When buying, we recommend that you buy a 16×20 machine. If you can’t get that, buy a 15×15 machine and upgrade to the former when the need arises.
Alternatively, you can use an iron box if you lack a press machine. However, the design might not come out as neat as you would want.
Note: Be aware of heatpress temperature settings while using this machine because if you use the wrong temperature your design will be destroyed.
If you want to know a little more about two popular printing techniques in t-shirt printing, as we have done on our article heat press vs screen printing.
Check Our Selected Top Rated Heat Press Machine Now!
2. Inkjet Printer
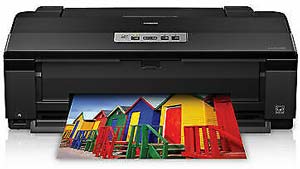
This is important, especially if you will be using the digital heat press method. The method lets you transfer printed designs from transfer paper to the shirt using the heat press machine.
The inkjet printer is used to print the design on the transfer paper. To get the best out of this, ensure that you use the right transfer paper, i.e., an inkjet printer paper.
Also, use a good quality inkjet printer for the best work. They give your work perfectly neat and immaculate finishing.
A good printer should be able to accommodate different sizes of sheets and paper as this will allow you to work with varying designs regardless of how big or minuscule they are.
Some printers will require the use of software for better results. Make sure you get one that is compatible with your printer.
3. The Screen
The screen is another vital material you will need for printing on shirts. This is particularly more important when you want to make screen prints. It is a simple material that you can make at home with a few things.
Besides, the primary use of this tool is in making stencils. These stencils are then transferred onto the shirt, thereby creating a design on it. Its functions are very similar to that of a heat press only that they are used for different methods of printing.
Working with a screen can be a little difficult as you will need a different one for each color you intend on transferring.
Also, you will need the screen to have a mesh count, the higher the mesh count, the more meticulous your design is going to be.
For context, if you are looking to make a puff and athletic design, you will need a mesh count of 15 – 90. While for general printing, it should be anything between 15 and 160 mesh counts.
If you choose to make your screen at home, consider using durable materials to make the frame- wood or aluminum can do the trick.
This will make it more sturdy and durable. Moreover, they are sensitive to light so remember to get something to remedy that.
Read More: Best File Format for Shirt Printing. Low-resolution files make poor-quality prints. Here are the best files for shirt printing!
4. Emulsion
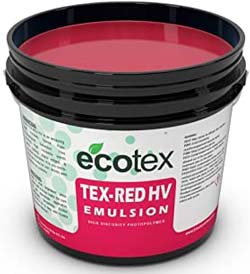
As we have mentioned earlier, the screen is sensitive to light. So to take care of that, you will need emulsion. It is a liquid substance that is applied to screens to reduce its sensitivity to light.
Usually, it is applied to the screen before using it. The hardening of the emulsion (when it’s exposed to light) is what creates the stencil.
Applying this chemical substance is easy. You will, however, need a particular tool to that, squeegee or a scoop coater is the most common. Make sure you have one of them handy when preparing for screen prints. We do a deep dive into printer for screen printing in our article on how to easily print screen printing transparencies by a printer.
To achieve an even and smooth transfer, apply a thick amount of emulsion to screens. This will give more room to the screen hence a better printing outcome and color saturation.
You will need to get a drying rack to dry the emulsion-coated screens. This will prevent them from mixing.
5. Ink
This is one of the most critical materials used when making any printing. Well, how can you see the design if not for the ink? They are different types of ink used for printing. They include plastisol or water-based inks.
For t-shirt printing, you will need a solvent ink. They come in different colors. For starters, you can get the primary colors like black, white, red, blue, or yellow.
If you wish to get a more unique and astute color, you can mix two or more colors until you are satisfied with the new one.
Getting a starter mixing system can help with the mixing, whereas quart containers are used to mix inks. You will need a scale also to weigh the ink before blending for a more precise outcome.
Read More: How to Put a Printed Photo On a Shirt. We show you a few different ways to do it!
6. Exposure Unit
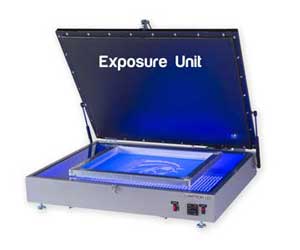
The exposure unit is the equipment used for curing the screen coated with emulsion. It pinpoints light to the stencil rather than allowing the full light of the sun. In the absence of this tool, you can use the sun to cure the stencil.
This is equipment has an oven-like shape where you place the screens while they absorb the light. While placing them in the exposure unit, make sure that both sides of the screen do not touch each other.
7. Washout Station and Water Source
After curing the emulsion-coated screen in the exposure unit, you will need to wash off excess uncured emulsion. Failure to that will make the screen get cured more when exposed to sunlight which can cause foggy work.
The washout sink is what is used for that purpose. It might be an improvisation or professionally made. What is essential is that there is a constant flow of water.
8. Conveyor Dryers
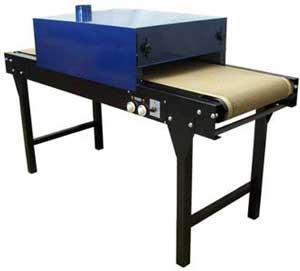
After washing off the screen clean, you will need to dry it, hence the conveyor dryer. They also heat the ink on the shirt, thereby setting it more on the shirt.
This ensures that the print does not easily get removed from it. This is the final step in t-shirt manufacturing.
Read More: Vinyl T-Shirt Printing vs Screen Printing. We’ve compared these printing methods so you can find the right process for your projects!
Additional Materials Needed for T-shirt Printing
After getting the necessary instruments needed for t-shirt printing, there are other materials that you may need. These are not necessarily important, but they can help make your work easier. Some of them include;
- Flash cure unit- this is used to cure the ink partly; this way, you can have overlapping colors in a shirt.
- Spotting gun- when used with a spotting gun solution, it can remove fingerprints, ink stains and plastisol drips from a printed shirt.
- Emulsion remover – this is used to wash off the emulsion from a screen. Doing this allows for the re-use of the screen.
- Curable reducer- this is used to reduce the thickness of an ink.
- Tape gun- this is used to cover up part of a shirt before printing. The sections covered are where the ink is not needed. This gives the work a neater finish.
- Degreaser- used to clean the surface of a screen before applying emulsion.
- Brushes- soft bristle brushes are essential in washing off stains. In t-shirt printing, they come in handy when using a degreaser, curable reducer and emulsion remover.
- Others include a flash dryer, film output device, spray adhesive, temperature tapes, and much more.
Read More: The Best Shirts for Sublimation Printing. Discover which fabrics work – and the ones that don’t!
Conclusion
By now, you might have noticed that printing on shorts is not much of a difficult task, especially when you have the right materials. The materials might seem like a lot, but you must get at least the basic ones. This way, when you start printing, you can get it right.
Conversely, after getting these tools, you must learn how to use them so that they can last you a long while. With this, we say to you, Happy Printing!
Also read: