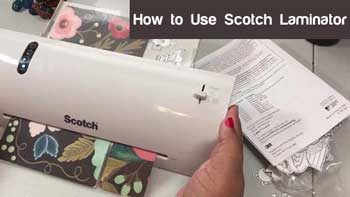
Trying to know how to use scotch laminator?
Then you come to the right place. We always try to write an easy DIY guide for our readers.
It’s worth investing in a laminator machine if you regularly make crafts, easy wipe-off worksheets for your kids and students.
If you are not that of a geeky person, using such a machine can be confusing for the first time, which is pretty standard.
You can laminate documents of various sizes. However, there are easy ways to do it, and that is what I am going to discuss in this article.
Scotch Thermal Laminating Machines Basic
Let’s have a basic understanding of a laminating machine first.
Scotch thermal laminating machines are of either two or four rollers. Your documents go through the rollers, and it uses heat to seal the thermal laminating pouches all around whatever you give inside, for example, paper, card, etc.
Most laminating machines can laminate documents of a maximum of 9 to 12.3-inches of width depending on the model. You can laminate smaller items such as tags, cards as well.
How to Use Scotch Laminator: Step by Step Guide
Using a thermal laminator machine is relatively easy and straight forward. To make it even more convenient to learn, I divided the process into three small sections.
Loading Your Document Inside the Pouch
There are various sizes of laminating pouches available in the market. Before buying one, make sure the pouch fits your machine. The folded side of the pouch must be smaller than where you feed the pouch into.
Also, make sure the document you want to laminate properly fits inside the pouch as well.
If you are working for a small project, be sure to use a smaller sheet to avoid wasting other parts of the pouch. You can buy a few smaller pouches instead of buying a larger one.
The durability of the lamination depends on the thickness of the pouch, which ranges from 3 to 14 millimeters. Depending on your requirement, get pouches of the right thickness.
However, some models cannot handle even thicker pouches. In such cases, be sure to check the instructions that came with the package of the machine. But most machines will easily handle pouches of 3 to 5-millimeter thickness.
If you want to reduce the white area around the object, do it before feeding it into the rollers.
Now it’s time to lay your document inside the pouch. As you probably already know, a pouch has one folded edge which makes the way to open the pouch easily.
Open it up and place your document against the folded edge. Be sure to leave enough space between the edges of your document and the edges of the pouch. Seal and close the pouch.
Avoid cutting and sizing the pouch before you put it inside the machine.
If you want to insert multiple pieces of documents or papers or cards inside the machine, place them inside the pouch while leaving enough space in between them.
It will make it easy for you to cut around those pieces while leaving a laminated edge around them as well.
Some laminator machines warn against inserting multiple pieces inside a pouch at a time.
Therefore, read the scotch laminator instructions given in the booklet of the machine.
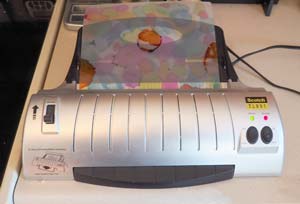
Putting the Pouch Inside the Laminator
This step is more comfortable than the one you just went through.
Turn on the machine and wait until it heats up. It may take up to 30 seconds for smaller machines, and up to 15 minutes for larger ones.
The reason your machine must heat up is that when the machine heats up, it activates the glue and makes it ready for the film.
When you see the indicator light, the machine is warmed up properly.
You might need to adjust the temperature depending on the thickness of the film. We discuss how you can measure the thickness of paper in another article.
Now, you need to adjust the speed as well, which determines how faster the pouch film will go through the laminator.
Set the machine at a lower speed for a thicker film. You can check the chart that came with the device to select the best suitable speed for the pouch you have.
However, the cheaper machines don’t have this speed adjustment option, and you have to go with a thicker pouch in such cases.
Carefully pick the film up and place the folded edge between the rollers; you shouldn’t make the paper move inside the film.
Also, make sure you place the paper straight; placing it an angle will make it crump.
Don’t push the film; the machine itself will grab it and take care of the rest of the task. It will take nearly a minute or two to go the pouch through the rollers completely.
When the laminating process is complete, and the paper is out, let it cool before attempting to trim.
Waiting for a few minutes will do excellent here. After that, cut around the edges of the document.
Be sure to leave a clear lamination around the edges of your document to make the seal hold better.
Tips to Improve the Scotch Lamination Process
You can improve your lamination quality following these tips –
Laminating Two Sheets Together
In most cases, printing on both sides of a paper causes the ink to bleed. To avoid such an issue, take the prints on two different sheets.
Then line up those sheets back to back within the pouch to laminate them. It will make a two-sided sheet efficiently.
Be sure to leave enough space around the edges of the sheet before trimming. Otherwise, it will make them apart comfortably.
Use a Folder to Avoid Moving the Pouch
If you have shaky hands and you struggle to keep the pouch straight, consider using a filing folder and place it at the bottom of the film.
Leave the folded edge outside the folder from the top for about 2 to 3-inches and place it into the rollers.
Don’t let the folder go through the rollers. Keep it in place, and let the page slip through the machine only.
It will make holding the pouch easy for you even there are a couple of pieces of paper.
Release Button
In some cases, the pouch might crinkle and jam on its way to the machine. It happens when someone puts the paper at an angle between the rollers.
If that ever happens to you, don’t let the pouch go entirely through the machine. Quickly press the “Release” or “Reverse” button and pull out the film.
However, some laminating machines may need to turn off to remove the jammed pouch. Therefore, go through the instruction manual that came with the machine.
Scotch Laminator Troubleshooting
Laminating like a pro requires practice and time. The more you laminate, the more you can overcome the difficulties.
As a beginner, you might face some issues if anything goes wrong. These are the most common reason for having a lousy lamination.
Cloudiness
If you get cloud in the laminated document, know that it’s because of insufficient heat. Be sure to check the temperature instructions regarding the thickness of the pouch and the weight of the paper.
Bubbles
When the temperature is too high, and the image on the document isn’t dry, it causes bubbles to appear in the laminate.
Set the temperature correctly and run the pouch through the machine once again.
Slivering
Slivering happens if the adhesive doesn’t wet out. You can eliminate the issue by slowing down the speed or increasing the temperature. Depending on the condition, you may require to try both the solution.
Lifted Edges
If the document is laminated on one side with high tension, it can cause curl toward that laminated side and end up raising the edges.
It happens if the paper inside the pouch is larger than it should be. There needs to be enough room around the edges of the paper. Make sure you insert the pouch straight into the machine.
Spots on the Document
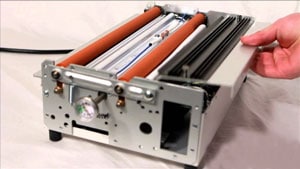
This issue happens when the glue deposits grow inside the rollers. You need to clean the rollers to solve the problem. There are cleaning kits available in the market for this job. Or, you can use some white spirits and use a cloth to clean the rollers. You may check the article about cleaning procedure of printer roller, which will be helpful for you to clean laminator rollers also.
Tips to Keep the Laminator Machine Running Smoothly
During a new season, there goes a lot of pressure on a laminator machine. When the machine is frequently used, the chances of getting the paper jammed are pretty standard matter. To help you with your work, here are top suggestions to make the machine run hassle-free.
Get the Right Laminator for Your Purpose
Not all laminators are the same. The one designed for home purpose; it cannot handle the tedious tasks of school work.
Similarly, if you use a laminator that is designed for school and office works, and you use it for commercial or professional purposes; the machine is less likely to last longer. The post to laminate paper at home or office has some additional tips for the user who wants to laminate paper by owns.
So, you need to select a laminator according to your needs. If you want a machine for home usage only, get one that is made for home use.
Similarly, don’t buy a heavy-duty machine for laminating your arts and crafts; it will make things complicated. If you know a little about paper crafting tools, you can get creative and make them look a little more stylish, as we have done on our another post about 15 essential paper crafting tools.
Room Behind the Laminator
There should be enough space behind the laminator for the document to exit. It will reduce the chance of jamming the machine and save your precious document from damaging.
Pouch Jacket
Using a pouch jacket protects the document from getting lost inside the laminator, and protects the machine as well. Laminating pouches tend to get loss of their adhesive inside the device, which causes malfunctions over time. It also makes the machine jammed.
Pouch jackets laminate partially filled pouches as well as small pieces of paper and leave no room for wrap-arounds.
As a result, there will be fewer jams and zero pricey repairs. You can consider getting films that are made from quality material like Teflon.
Check Instruction Manual
In many cases, customers face problems with their machines because of using unsuitable accessories and supplies to laminate their documents.
There are specific instructions in the manual guide for the size of the pouch you need to use, the ideal temperature depending on the thickness of the bag.
When someone doesn’t go through that guideline and randomly buys a pouch and sets speed and temperature without having proper knowledge, that’s when the problem begins.
There are also guidelines regarding cool down, heat, angles, temperature, weight, and thickness of the pouch, do’s, and don’ts in the instruction manual to make the machine run smoothly.
Don’t Rush to Insert the Document Into the Rollers
You should never hurry to insert the paper into the machine. The laminator will do the work itself. If you wait for an extra few seconds and avoid pushing the pouch, it can save your document from damaging and repairing cost of the laminator.
Don’t insert the paper at an angle or with the open end of the pouch. Otherwise, it will crinkle and fold the document and may also cause a jam.
Cool the Laminator Down Before Turning It Off
When we are busy or in a hurry, we often immediately turn off the laminator and walk away just after getting your hot and crisp document from the machine. This practice is harmful to the rollers inside the machine.
You need to wait for about 15 minutes to let the laminator cool down before turning it off. However, waiting time varies depending on the models; check the instruction manual to know the exact time for your laminator.
A good quality laminator has a dedicated “Cold” option that helps the user to make the laminator cool down properly.
Put the Machine on a Stable Surface
You should not put the laminator on an unstable and shaky surface. If it shakes during operations, it will make the pouch to shake as well and jam the document. Make sure you place the machine on a flat and stable surface to prevent such complications.
Properly Insert the Document
Always insert your document from the folded side of the pouch. If the sealed end goes inside of the machine first, it will minimize the chance of jamming and prevent malfunctioning as well.
Final Words
Laminating document is a relatively easy process if you follow the basic instructions that are given in the manual. People face issues because they think it’s too easy to use such a machine and don’t care about the guidelines.
Incorrect temperature can cause various issues while laminating a document. Be sure to check if you set the temperature correctly considering the thickness of the pouch. And, always purchase the right laminator machine for your work.
Happy Laminating!
Our Other Blog Posts: