3D printers are complex machines. They can be used to create incredible printed models and prototypes.
Running into infuriating moments when using the machine is surprisingly common. There might be times when the machine may simply refuse to print properly even when you think all the settings are right.
To help you keep your machine running smoothly at all times, we have compiled a list of the common 3D printing problems you may face when operating the machine along with their possible solution.
Let’s get started!
Common 3d Printing Problems and Solutions
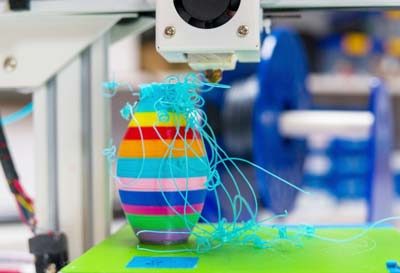
1. There Are Cob-like Strands Across Different Parts Of The Model
What you have here is a common 3D printing issue known as stringing. This happens when the printer head leaks some of the filament in spaces where it shouldn’t be printing. This can make a print look terrible.
One of the ways to prevent this from happening is by tweaking the temperature. However, this may not always stop strings from forming when printing complicated models.
The best way to eliminate this problem is to enable your printer’s retraction settings. The setting allows the filament to retract back to the nozzle before the printer head starts moving. This prevents the filament from dripping which in turn reduces stringing.
What is retraction in terms of 3D printing? Find out all you need to know about retraction, including common problems, in this post!
Read More: Why 3D Printing is Bad. We share reasons why it’s bad and why it’s GOOD here!
2. My 3D Model Starts To Bend From The Edges
If the base of your printed model begins bending from the edges, it is warping. When this occurs, the base of the model will no longer be parallel to the printing platform. Warping not only causes distortion of the model from the edge, but it can also crack segments of the print.
Warping usually occurs when the print cools rapidly. When this happens the ABS or PLA filament starts to contract, distorting the print slightly.
There are various ways to fix this problem. One of the ways is to use a pre-heated printing platform. Getting the temperature of the platform a bit below the material’s melting point. This will allow the first player of the print to lie completely flat on the platform. You can set the temperature of the filament using the slicer software.
If that doesn’t work, you can apply an adhesive to the platform. This will keep the base layer in place and prevent it from rising. Also, check if the printing platform is leveled. If the platform is not calibrated properly, it can cause warping. Check the calibration and make sure that the platform is completely level.
Read our related article on How to Keep 3D Print From Warping. If you have trouble with warping, here are a few things you can do to prevent and fix warped prints!
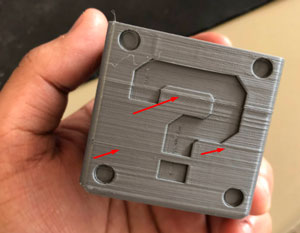
3. Why Is My Model Cracking?
One of the most common causes of cracking in prints is airflow. They often appear on the sides of a printed model. Too much airflow around the print accelerates the cooling on one section and will most likely cause the print to crack.
You can shield the printer from breezes by covering the entire printer if you can. Use sheets of plastic, paper, or cardboard to prevent the air from reaching the model.
A low filament temperature will most likely be the other cause of cracking. Generally printing with lower temperatures will result in a weaker layer bond. To solve this, adjust the temperature of the extruder.
For most filaments, you need to find a temperature that approaches the high end of the filaments ranges in order to get the best interlayer bond.
Read More: What is Slicing in 3D Printing? Learn all about slicing in this quick guide for beginners!
4. How To Clear A Blocked Nozzle?
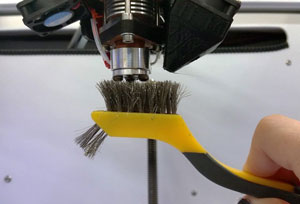
When you are about to start printing a 3D model and nothing comes out of the nozzle, then chances are that the nozzle is blocked. There can be multiple reasons as to why this happens.
One of the likely causes of a clogged printer nozzle is the hardening of molten plastic from the previous print. The buildup of dirt or a snapped filament can be a likely cause as well. It can also occur when bits of filament is left behind after spools are changed.
Speaking of spools… check out our guide where we discuss What to Do With Old Filament Spools!
So how to clean a blocked 3D printer nozzle? There are many ways to clear blocked 3d printer nozzles. One of the easiest ways to get the nozzle unstuck is by using a small needle to pry out the solidified material. You can also break the blockage into small pieces so that it comes out the next time the filament comes out.
Another way of unblocking the nozzle is to do a cold pull. To do this, heat the hot end to about 250 degrees Celsius. Then push the filament through the heated nozzle until the previous material is cleaned. After that, let the hot end cool down.
You can also remove the nozzle and remove the gunk using solvents. ABS and PTEG or PLA can be chemically dissolved using acetone or ethyl acetate. Simply submerge the nozzle in the solvent for a couple of hours and the stuck filament will be removed.
Read More: What is a Hot End On a 3D Printer? Learn what you need to know about hot ends, including the best options!
5. Too Much Of The Filament Is Being Extruded
Over extrusion occurs when too much of the material is extruded. This causes the model to be inaccurate and ruins the overall quality of your print. If your print shows signs of oozing or stringing, then there is a chance that your printer is over extruding.
To eliminate this problem, try decreasing the extrusion multiplier. The flow setting in the 3D slicing software shows the rate at which the printer ejects plastic. Decreasing the setting by 2.5% increments will prevent the printer from extruding too much of the material.
If decreasing the extrusion multiplier doesn’t work, you can try lowering the print temperature. High printing temperature will melt the filament faster. This results in the filament ejecting out of the nozzle at an uncontrollable rate.
Lower the print temperature using 5-degree increments until you find the perfect temperature where over extrusion stops occurring.
Read More: How to Speed Up 3D Printing. 3D printing process too slow for your needs? Here’s what you can do to speed up printing without sacrificing quality.
6. Layer Shifting Half Way Through Print
Layer shifting occurs when the layers of your 3D model are misaligned, giving it a ‘staircase’ look. This problem renders the entire model useless. The effect happens when there is a problem with the extruders X/Y motion system. It can also happen due to the lack of proper maintenance.
There are many reasons as to why the printer may suddenly print models with shifted layers. One of the reasons is loose printer pulleys and belts. Like all mechanical parts, the pulleys and belts of a 3D printer may start to slack overtime. This results in slippage which causes the layers to shift.
To fix this problem, inspect your printer’s motion system. Make sure the belts have proper tension. If they are loose, check to see if the printer has a built-in tensioner otherwise you might have to consider replacing the belts. Also, make sure the pulleys which are held in place by screws are tight.
Layer shifts can also happen when the printer head collides with the model being printed. Most 3D printers are unable to detect collisions. They continue printing regardless if the path is blocked or not. To solve collision-related issues, simply lower the printer’s travel speed.
You can also enable the Z-hop setting from the slicing software. By activating this setting, the printer head will skip through the parts that have already been printed when traveling. This ensures that the nozzle always steers clear from any of the printed areas.
Read our related article, What Causes Layer Shift in 3D Printing? for more possible causes and solutions!
7. Printer Stops Extruding Mid Print
If your 3D printer stops moving mid print, there are multiple possible reasons why this may happen.
One of the obvious reasons for this to happen is when your printer runs out of filament. If you are working on a project that requires a considerable amount of filament, it is always a good idea to check the amount of filament left in the spool. If it has run out, simply replace it with a new spool.
It is also possible for the extruder to get clogged in the middle of the print. If that is the case, check the extruder for any signs of blockages. Also, look out for any traces of dust in the spool. You want to make sure that the filament is clear of any dust as it will build up in the nozzle, causing the nozzle to clog.
Also, there might be a chance that the extruder motor driver is overheated. The mechanism is constantly in motion during the printing process, pushing the plastic back and forth. The motion generates heat and if it doesn’t have sufficient cooling, the driver overheats. To resolve this issue, simply turn off the printer and all the components to cool down.
Read More: Interesting Facts About 3D Printing. Here are our favorite fun facts!
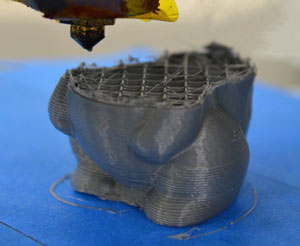
8. Weak Infill Patterns
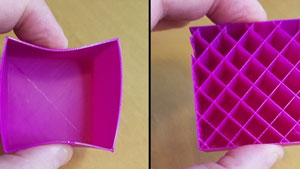
What is 3D infill?
Infill is what gives your model its overall strength. It connects the outer shell of the print and also keeps the upper surfaces from collapsing. A weak infill means that the final product will not be as robust. By tweaking a few settings can eliminate this issue.
The best solution is to try a different infill pattern. The software allows you to use a wide variety of patterns. Some of the patterns have fewer hollow spaces in between, making them more solid than others. You can try a solid honeycomb or triangular pattern if haven’t used them already. They will add strength to your model.
Also, try lowering the printer speed. If the speed is too fast, the extruder will have a hard time keeping up. As a result, there might be some under-extrusion in certain parts of the infill. This will cause the infill to be weak and stringy. Reduce the speed by adjusting the printing speed settings.
If using a different pattern and lowering the speed doesn’t work, then increase the width of the infill extrusion. The 3D printing software allows you to set the extrusion width for the infill. This allows the printer to create thicker infills, that will strengthen the printed model.
Read More: How Long Can You Leave a 3D Printer Running? Should you run your printer for hours or days without pausing?
9. Inconsistently In Extrusion
Consistent extrusion is essential to create accurate models. An inconsistent extrusion will affect how the model looks in the end. An inconsistent extrusion can be noticed by closely inspecting the printer as it prints. When printing a straight line, if the extrusion is either bumpy or varies in size then you are probably facing this issue.
One of the first things you need to inspect is if the filament is tangled on the spool. If it is, then the spool won’t be able to move freely. This, in turn, will impact how the filament is extruded from the nozzle. To fix this, you need to make sure that there isn’t much resistance. Apply some lubrication to allow the mechanism to function smoothly.
A blocked extruder can also cause inconsistencies in filament extrusion. Check to see if there is any dirt or debris blocking the nozzle. If there are any, you need to clean it or consult the manufacturer for assistance.
The quality of the filament used also matters in this case. Poor quality filament consists of additives that affect the consistency of the extrusion. Also, certain plastics tend to degrade over time, which lowers its quality. Try using a new spool and see if the problem goes away.
Read our related article, What Causes Stringing in 3D Printing? Here’s another common problem in 3D Printing along with possible solutions!
Conclusion
Using 3D printers can be frustrating sometimes. That’s because there are many problems that’ll emerge right when you use the printer.
However, most of the time, solving common 3D printer problems is not difficult at all. In fact, most issues can be solved almost instantly by altering the settings on your printer’s software.
However, in the case of a mechanical failure, it is best to consult your printer’s manufacturer for assistance.
We hope our 3D printing troubleshooting guide will resolve any issues you have or may have when using a 3D printer. I hope you will do very well in your 3D printing business.
Good luck!
Some Resources That You May Like: