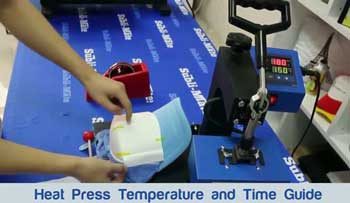
 Heat press machines are one of the best ways to print on surfaces because then the end product is usually spick-and-span.
Another reason they are popular is that they can be used to produce a large number of prints in a short period.
Sometimes, this is not always the case. If you are into printing, you will agree with us that you’ve had a few bad experiences.
It could be that the design wasn’t just coming off well, or that the design wouldn’t stick to the surface. This may be a significant setback, especially if you are new to this.
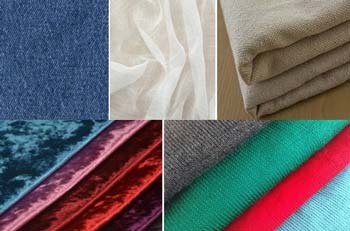
One of the reasons that you have such problems is that you didn’t allow the right amount of time or the temperature was too low or high. The thing is that different types of fabric have different temperatures and time settings.
To help you avoid these setbacks, we have compiled heat press time guide and temperature chart for some of the most prevalent fabrics used with this machine. All you need to do is read on, and you will learn more.
Heat Press Temperature Chart
- Polyester: 270° F
- Cotton: 380°F
- Stretch Material: 335°F
- Vintage: 350°F
- Full Color: 350°F
- Glitters: 350°F
- High-Quality Digital Prints: 305°F
- Reflective Fabrics: 305°F
- Glow in the Dark Fabrics: 350°F
- Stubborn Fabrics: 330°F
- Metallic Finish: 320°F
- Photo Transfer on Light Fabrics: 385°F
- Photo Transfer on Dark Fabrics: 356°F
- Multi-Purpose Material: 350°F
How to Set the Time and Temperature Setting for a Heat Press
We understand that most heat press machines come with a user manual that explains how to make essential functions like setting time or temperature. But we also know that the guide can be misplaced or damaged before you have the chance of reading it.
And to get the time and temperature right, you will have to know how to set them to the ‘right’ one. This is why we have decided to give a brief explanation of that.
See our related article where we review the Best Affordable Heat Press for Beginners.
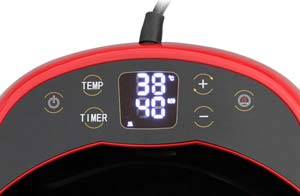
Setting the time
To set the time is not a difficult task. Most heat presses have either a digital time display setting that lets you adjust it by pressing any of the ‘up or down’ arrow keys or buttons. While some have a more traditional dial that you can adjust by simply turning it to your preferred time.
Modern heat press machines have a self-off feature that turns the engine off or even open the lid when the timer runs out. You can identify the time dial by the minute or second sign next to the numbers.
Setting the Temperature
This is just like setting the time; the only difference is that the dial now has either a Celsius or Fahrenheit sign. It is pretty much just like making use of a microwave oven or an oven.
See our related article on How to Use a Heat Press Machine! New to heat pressing? This ultimate guide covers the bases for beginners.
Heat Press Time and Temperature Guide
As we have mentioned previously, the quality and clarity of a transfer are dependent on some factors. The factors are time, pressure, and temperature. For the graphics transfer to be successful, the values of these factors must be set to the value required for the fabric you are working with.
Also, the values differ for both light-colored and dark-colored fabrics. Where light-colored fabrics are better off with lower temperatures, darker colors will go with higher temperatures.
Before we go any further, we want to state another thing that can hinder or make your transfer untidy is making use of a shirt that is dirty or creased. So always ensure that the shirt is free from dirt, especially oil stains. Also, make sure that the shirt is pressed and free of creases.
Without further ado, here are the guidelines for time and temperature. We will also tell you when the appropriate time to peel off the transfer paper is.
See our related article on How to Remove HTV From a Shirt! Made a mistake? No problem! These easy fixes will get you back on track in no time.
Polyester or Sublimated Fabric
This type of fabric is very delicate and does not require much heat. When printing on it, it is crucial that a moderate amount of heat is applied and it should not stay long in the machine.
The perfect temperature for this fabric is 270° F, while the appropriate amount of time is 10 seconds. And the best time to peel the transfer is when it is still hot. We discuss in details about shrinking polyester clothing easily in our another article.
Read our related article, What Does Sublimated Jersey Mean? Here’s what you need to know!
For Vinyl
Vinyl is the easiest and least expensive item to start working with your heat press. To achieve the best output from vinyl, you’ll need comparatively more temperature than Polyester.
The ideal temperature for vinyl is 320°F. Use the machine with firm pressure for 10-15 seconds to get a vivid and perfect design.
In fact, preheating the fabric before start pressing will result in a better print on your shirt.
While crawling the market in search of Vinyl, you may get confused about whether to choose the “Series 31 Vinyl” or “Series 51 Vinyl”.
Well, there’s a simple difference between those. We do a deep dive into heat press vs screen printing in our article.
The Series 51 contains a gloss finish with permanent adhesive.
On the contrary, the Series 31 is well known for its matte finish with removable adhesive. This monogram machine post has some additional tips before buying vinyl monogram machine for casual use.
Cotton
Cotton is widely used in the production of shirts. It is durable and can withstand high heat. When transferring to cotton material, the ideal temperature is 380°F and that of time is 15 minutes. It is better to peel off while it is still hot.
Read More: Sublimation Transfer Not Working. Here’s how to get successful prints every time!
Stretch Material
Working with this type of material can be tricky. This is because the printed graphic tends to stretch with the fabric leading to it looking frayed. To get the best out of it, ensure you use the machine at 335°F for 10-12 seconds. Allow the print to cool off before removing the transfer paper.
Vintage
This gives off that faded pristine old look. It is a fashionable trend that has been around for a while. To achieve this, you will need to print the design at 350°F for 10-12 seconds. Peel the design while it is still hot.
Full Color
To print your shirt with the full colors showing and perfect contrast, remember to print at 350°F for 12 seconds. Peel of the transfer while it is still hot.
Read More: What Kind of Material Can You Sublimate On? See which materials are best for sublimation printing!
Glitters

Glitters are a textured design that has sparkles in them. It is not difficult to make if you stick to the right temperature and time of 350°F and 15 seconds, respectively. Also, remember to peel off while the shirt is still hot.
High-Quality Digital Prints
When you print the graphics on the transfer paper digitally, you have to maintain the quality. For that to happen, you will need to put it at a temperature of 305°F and for about 5 minutes for the transfer. Removing the graphics should be done when it is still hot.
Reflective Fabrics
This type of prints is more common on safety wears. It is because they have a reflective surface. To make this transfer, you will need to get the right transfer paper. The ideal temperature for this transfer is 305°F while the time is 10-12 minutes. It is best to peel off when it is cold.
Glow in the Dark Fabrics
Children’s nightwear, Halloween costumes all have a way of glowing in the dark. This happens when the cloth has been exposed to light at first and taken into a dark place afterwards. Making this type of transfer will also require getting the right transfer paper.
To achieve the best result, set the temperature at 350°F and work for 10-12 seconds. Peel off while it is still hot.
Read More: How to Sublimate On Canvas. Learn about sublimation printing on canvas here!
Stubborn Fabrics
Just as the name implies, making a transfer to this type of fabric can be difficult. This is the reason why it is vital to get the time and temperature setting right. We advise that you use a temperature of 330°F for 15 minutes. Also, peel off when it is still hot.
Metallic Finish
Some clothing materials have this finish that makes them look like metal. To get this, all you need to do is make a transfer at a temperature of 320°F for 20 minutes. Allow it to cool down but not completely before peeling off.
Photo Transfer on Light Fabrics
Set the temperature to 385°F and the time to about 20-30 minutes when you want to get the perfect graphic transfer on a light fabric. By doing this, you are almost guaranteed an impeccable finish. Peel of the transfer paper when it is still hot.
Photo Transfer on Dark Fabrics
Transferring a photo or image to darker fabrics requires less temperature when compared to light fabrics. For a successful transfer to this type of material, set the temperature at 356°F and time at 25 minutes. Then remove the transfer paper while it is still hot.
Relevant Article:
◩ Remove Screen Printing from a Shirt Easily
Multi-Purpose Material
This type of material can be used for different purposes. To make a perfect heat transfer with it, you will need a temperature of 350°F and set the timer to 10-12 seconds.
Conclusion
This information can be overwhelming, especially if you are new to this. But don’t let that stop you. You do not have to know all this. Jotting them down on a piece of paper can do wonders, you know.
Another way to do this is by bookmarking the page and checking when the need arises.
Remember, the first part of getting a good transfer is getting the appropriate materials. Then comes in the temperature and time setting. We are confident that if you stick to this guideline, you will make the best of transfers.